The Microsoft SQL Server Management Studio, shortly called SSMS, is a Flexible and most powerful open-source desktop tool to work. The Microsoft Management Studio is not the actual server but provides an opportunity to connect and work elegantly.
Or say, SSMS enables you to connect with any available instance. Next, we can use Management Studio to create a schema, database, tables, views, stored procedures, backups, etc. It is the most powerful graphical user interface where we can perform multiple tasks without writing a single line.
Microsoft SQL Server Management Studio is an absolutely free tool, and you can download it from the website to connect with an instance and work with a database. In this section, we will cover most of the options available in this Management Studio or SSMS tool. It will be the same for the previous versions or the latest version.
How to start SQL Server Management Studio?
A few people may be confused between SQL Server and Management Studio and feel like the same but there is an absolute difference between them. SQL Server is the actual server responsible for managing our data in the form of databases and tables. At the same time, Management Studio is a graphical interface that allows you to perform all options on the Sequal Server.
To open or Start the SSMS, type Management Studio on the start page or open the Run dialog box and type SSMS.exe. Alternatively, you can navigate to the 64-bit or 32-bit installations in your operating systems’ c folder program files and double-click the EXE file or application.
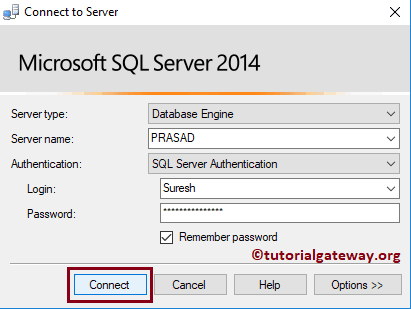
SQL Server Instances: Once you click on the Microsoft SQL Server Management Studio Exe file, a new window called Connect to Server will open. The SSMS integrated environment will help you to connect with four different Server Types.
- Database Engine: To work with relational databases. We use the Transact queries to communicate with the databases and data warehouses.
- Analysis Services: This is to work with Analysis Services (SSAS).
- Reporting Services: This type works with Reporting Services (SSRS).
- Integration Services: To work with Integration Services (SSIS).
TIP: By default, it automatically installs alongside Management Studio. Please refer to Install Software to understand the steps involved in installing the Server or configuring SSMS setup completely. And refer to Install SSMS to follow the steps in installing the Management Studio only. The process will be the same for SSMS prior to or older versions. To remove the SSMS, use the Uninstall SSMS article.
If you don’t have an SSMS SQL Server Management Studio setup, you must use the command line to work with the Server instead of this beautiful graphical interface. Let me select the Server type as Database Engine.
Server Name: It is nothing but the instance Name to connect SQL Server Management Studio with database engines.
- Default Instance: If you installed with Default sql server instance name, you could use localhost, system IP Address, ., computer name.
- Named Instance: If you installed with Named Instance, then you have to specify the instance server name., For example, if your system name is PRASAD, and your instance name is John, then use PRASAD\John
Authentication: You must select the authentication you want to use for connecting to the SQL Server Management Studio.
- Window Authentication: If you are the system admin, and installed it on the local computer, then you can use this option. Refer to the Create a Windows Login article.
- SQL Server Authentication: We must always use this authentication mode in real-time. It will ask the user to enter the Username and Password to connect. Refer to the Create Server Login article.
Here I am using the Server Authentication, providing my login credentials, and clicking the connect button. It will automatically start the database engine using the server name. Please refer to Login Errors article to see the common errors you may face.
Microsoft SQL Server Management Studio Interface
By clicking the Connection, the below-shown graphical interface will open. It is what we call an SSMS database engine. If we want to write a script against any database, we must click the New Query button.
Once you click the New button, the query window will open in SQL Server Management Studio.
- Object Explorer: A Tree view structure will display all the database Objects in a Server.
- Databases: Holds the databases that are available on the server. It includes databases that belong to Database Engine, Analysis Services, Reporting Services, and Integration Services. Please click on the Databases folder to see the list of Databases present in the Databases folder.
- Security: It contains all Security related things. Use this folder to Create Logins, Server Roles, etc.
- Server Objects: This folder contains information about Linked Server, Service Brokers, System Endpoints, Database Mirroring, etc.
- Replication: This folder contains information about Subscriptions and publications.
- Management: Use this folder for maintenance, such as Checking Server Logs, Session health, etc. This folder is for creating Maintenance Plans.
- Query Window: To write a script against any database. Or you can use Query Builder to build your script using a graphical interface.
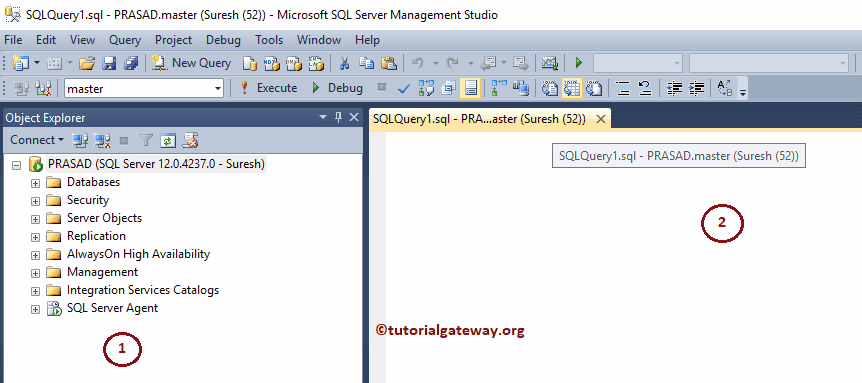
TIP: From the SQL Server Management Studio Object Explorer, you can connect and disconnect from the Server. Here, there is a Refresh button, and you can use this button if you don’t find the changes you made
List of Items in SSMS Standard Toolbar
The list of available buttons and their uses in the Management Studio Standard toolbar
- New Project: It creates a new project such as Black Solutions, Scripts, and Analysis Services Scripts.
- Open File: To navigate within the file system to select the script file.
- Save: Use this to save the file system’s current window.
- Save All: This will save all the script windows in the file system.
- New Query: If we want to write a script against any database, then click this New Query.
- Available Databases: This drop-down list will display all the available databases on this server. You can select the database that you want to work on.
- Database Engine: Opens a New window and connects to the database Engine window. First, you must connect with the Database Engine, and then you can use the query window to write your command.
- Analysis Services MDX Query: Opens a New MDX window and Connects to the Analysis Services window. First, you must connect with Analysis Services and then use the MDX window to write your MDX against Cube.
- Analysis Services DMX: Opens a New DMX window and Connects to the Analysis Services window from the SQL Server management studio.
- SSAS XMLA: It opens a New XMLA window and Connects to the Analysis Services window.
- Cut: This button will cut the selected text.
- Copy the selected text.
- Paste the Cut or Copy content.
- Undo the changes
- Redo the changes in the window
- Navigate Backward: Use this button to Navigate Backward
- Navigate Forward: To Navigate Forward.
- Activity Monitor: Please click this button to see the activity monitor. It contains information about the process, Resources, data Files, etc.
- Start Debug: To debug your code.
- Find in Files: Use this to find your files.
- Find: To find the required text in a query window.
- Solution Explorer: By clicking this, the Solution Explorer Window added to SSMS
- Properties Window: By clicking this button, the Properties Window added to SSMS
- Toolbox: By clicking this button, Toolbox added to the left side
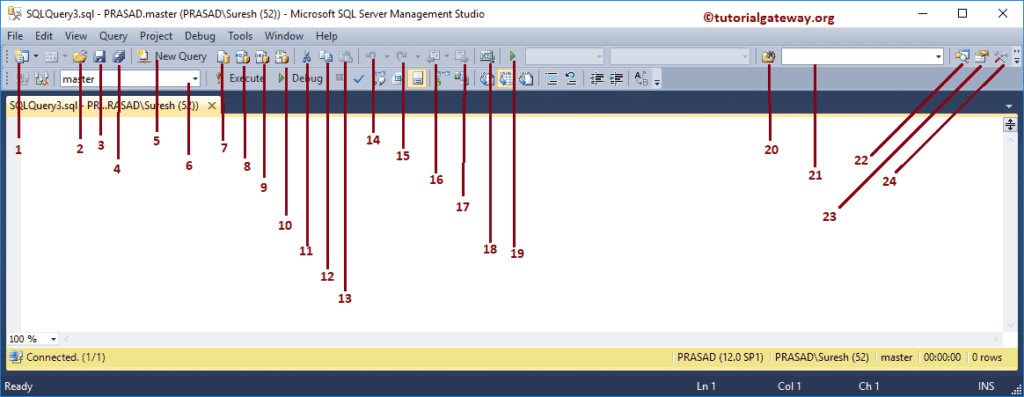
As we said, if you click on the New Project (1) button in the SQL Server Management Studio, the New Project window will open. Here you can select Scripts, Analysis Services Scripts, or Black Solutions.
When you click the Find and Replace button, i.e., number 20, it opens a window to find and replace text within the query. Use this to replace anything inside it.
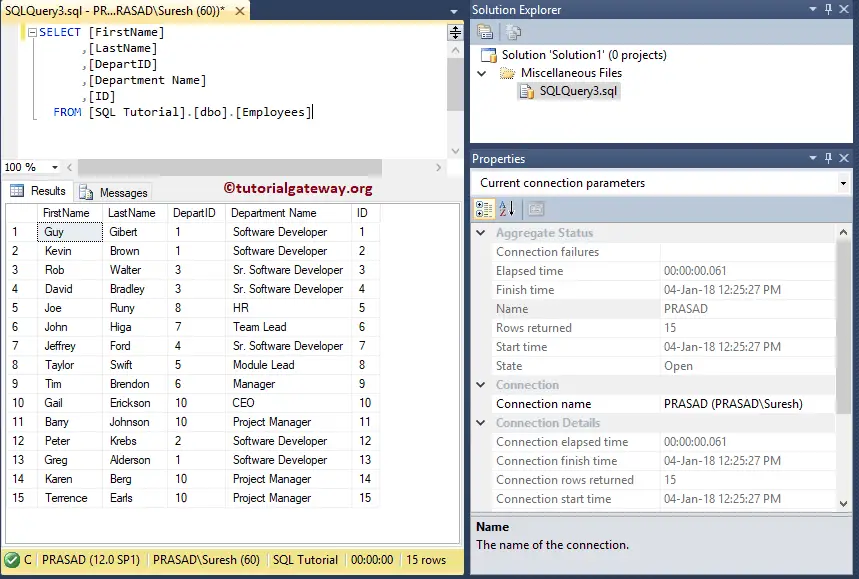
Solution Explorer
The Management Studio Solution Explorer will show you the file information. The Properties Window will show all the information about the query, such as Connection, Execution time, Duration, returned rows, etc.
Microsoft SQL Server Management Studio Editor Toolbar
Let me show you the available buttons and their uses in the Management Studio Editor toolbar.
- Connect: Used to connect to Server.
- Change Connection: You can change the existing connection by clicking this button.
- Available Databases: This drop-down list will display all the available databases on this server. You can select the database that you want to work on.
- Execute: It executes the query inside the window and returns the result in the result pane.
- Debug: Help you to debut your code.
- Stop: It will stop the running query. It will help you to stop the long-running query.
- Parse: Use this to check whether the Query is parsed or not.
- Display Estimated Execution Plan: This will display the Estimated Execution Plan for this particular script
- Query Option: Use this button to set the ROWCOUNT, TEXTSIZE, and execution timeout.
- Intellisense Enabled: You can enable SQL Server Management Studio Intellisense for this query window by clicking this. It will help you to find the syntax errors, and it will auto-suggest the function names.
- Include Actual Execution Plan: This option will include the Actual Execution Plan and results. It will help you understand the execution.
- Include Client Statistics: Enabling this option will include the Client Statistics (Execution type, Bytes sent and received, etc.) along with the result grid. It will help you understand the execution.
- Result to Text: The result in the management studio will be displayed as text.
- Result to Grid: The result will be displayed in table or grid format. It is the default one.
- Result to File: This option saves the query result in a text file.
- Comment out the Selected Line: Click this button to comment on the current line.
- Uncomment the Selected Lines: Click this button to uncomment the current or selected lines.
- Decrease Indent: Used to decrease the distance
- Increase Indent: Use this to increase the distance. Use Decrease Indent, and Increase Indent to organize the code accurately.
- Specify Values for template parameters: Used to specify Values for template parameters.

SQL Server Management Studio Menu
There are nine Main Menu items in the SSMS, and each has multiple submenus and nested items. This section explores most of them in detail.
File Menu: Use the File menu item to Connect Object Explorer, create a new Project, Open existing projects and files, save the queries, and close. For this, click the File Menu -> New -> Choose the required option.
Edit Menu: It performs Cut, Copy, Paste, Delete, Replace, etc. We already explained them in the SQL Server Management Studio Standard Toolbar section.
View Menu: It is one of the crucial menus, and the following Management Studio screenshot will show you the list of available options on this menu item.
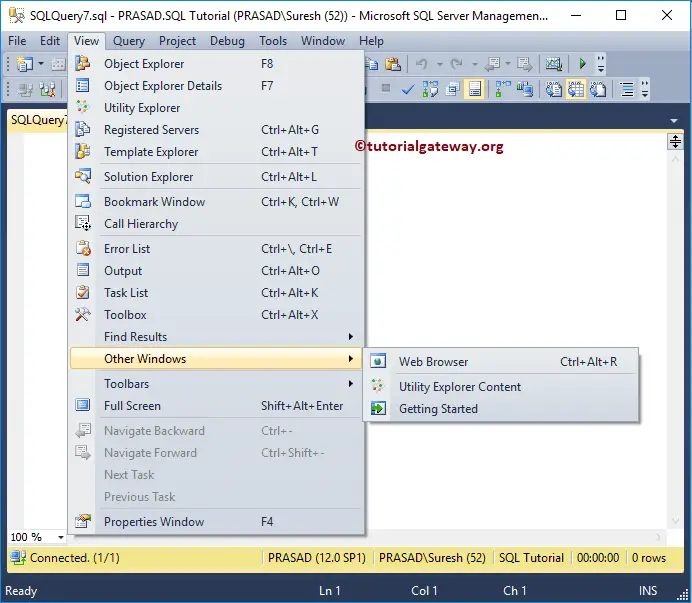
If your SSMS is not displaying the Object Explorer window, clicking the Object Explorer sub-menu will restore the window for you. In addition, the Microsoft SQL Server Management Studio can also show you the report for each object you select.
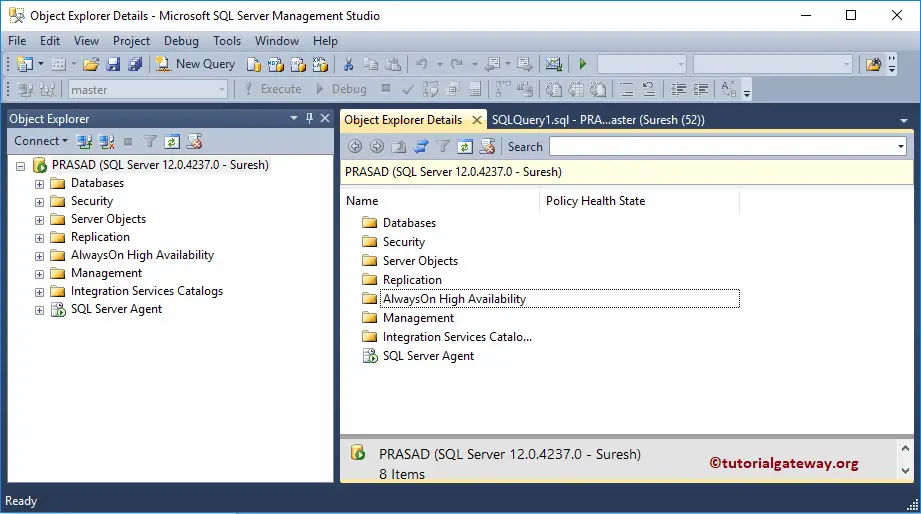
To get this information, choose the Object Explorer Details sub-menu in SSMS. Use the Forward and Backward navigation to move forward and backward.
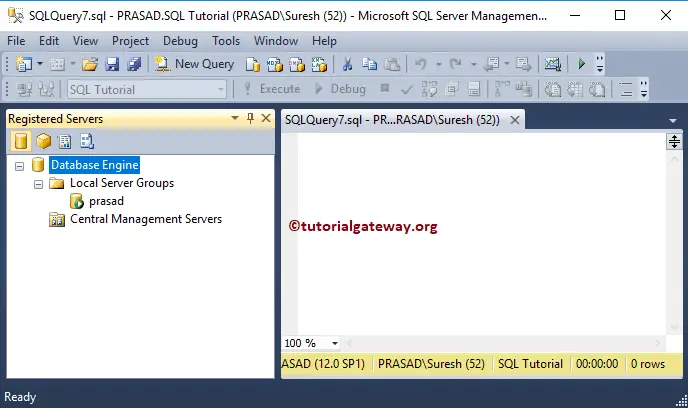
Select the Registered Servers sub-menu from the Management Studio View menu. It displays the server that you manage frequently. By clicking the Cube, you can see the Analysis. Clicking the report button will show the report, and the last button will display the Integration.
Select the Template Explorer sub-menu from the Microsoft SQL Server Management Studio View menu. Once you pick the Template Explorer sub-menu, the Template browser is added to the SSMS.
Under the Template browser, you can see all the existing templates and their definitions.
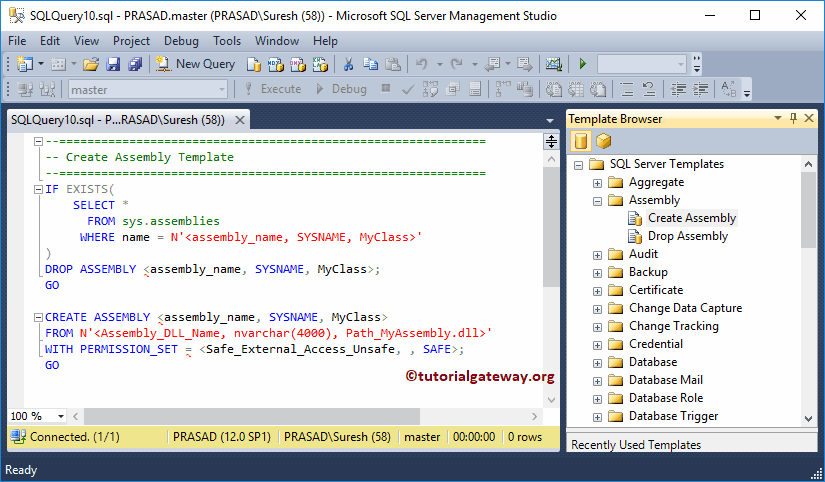
Under the Management Studio Analysis Services Templates, you can see the DMX templates, XMLA templates, and MDX templates. By clicking on an individual item, you can see its definitions.

Query Menu: We already explained all these options in the Editor Toolbar section. Always enable IntelliSense so that you can check the syntax errors. Similarly, change the Result to Text, Grid, or File as per your needs.
Debug Menu: Use the Debug menu to Start Debugging and to work with Breakpoints in the Microsoft SQL Server Management Studio.
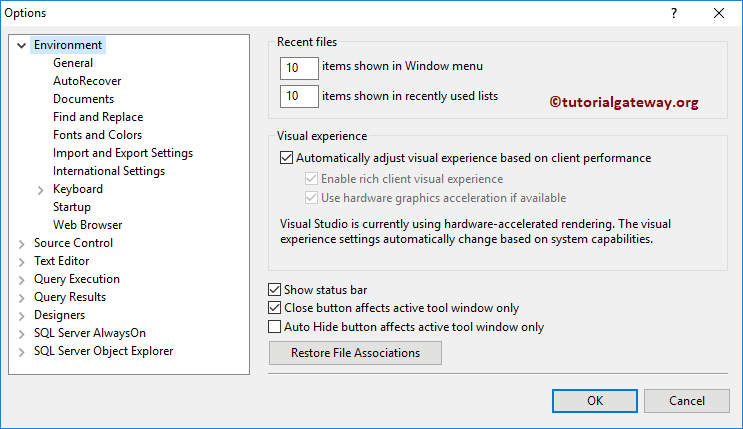
Tools Menu: Use this Management Studio menu to personalize the designer view, choose the third-party toolbox items, etc. We will explore the Options sub-menu for now, so let me select it. To do so, use the Tools Menu -> click on the Options…
By clicking the options.. the following window will open. Use this window to change the SQL Server Management Studio default color, font type, Size, weight, Keyboard shortcuts, etc.
I suggest you explore all the options but remember to note the changes you made. Then, if anything wrong happens, this will help you to recover quickly. Or, use the Restore Defaults button on each page to restore the settings to default.
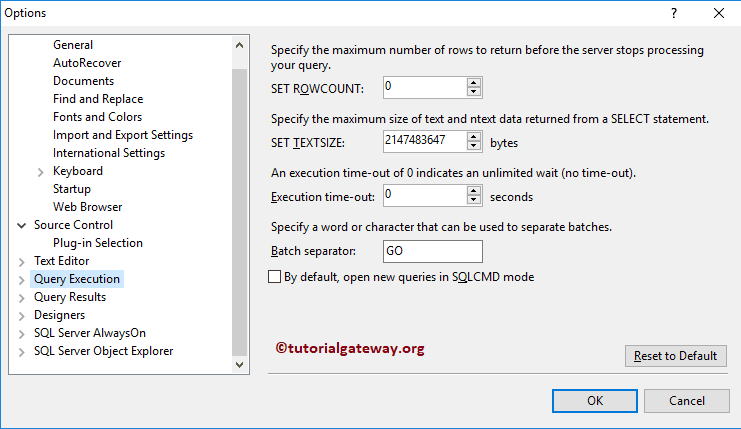
Query Execution: You can set the default ROWCOUNT, TEXTSIZE, and execution timeout.
Query Result: You can alter the default destination of the Query result.
- Result to Text: The result will display as text.
- Result to Grid: Result displayed in table format or grid format. It is the default one.
- Result to File: Use this option to save the query result set in a text file so that you can use that file for further analysis.
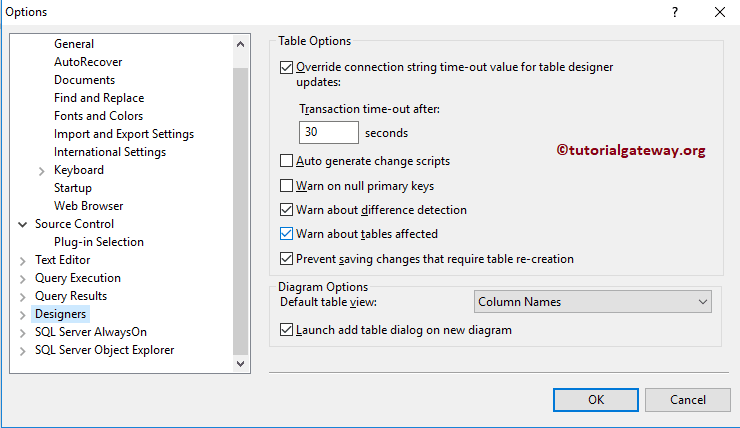
Designer: Use this SQL Server Management Studio page to change the table option that includes the connection string timeouts and warning about primary keys nulls and differences.
Windows Menu: You might have incorrectly positioned some of the windows (panes) if you are new. In this situation, you can use the Reset the Window layout to restore it to its original position. For this, go to Windows Menu -> Choose the Reset Window Layout option.
TIP: Please refer to Uninstall to understand the steps involved in removing or uninstalling SSMS only.