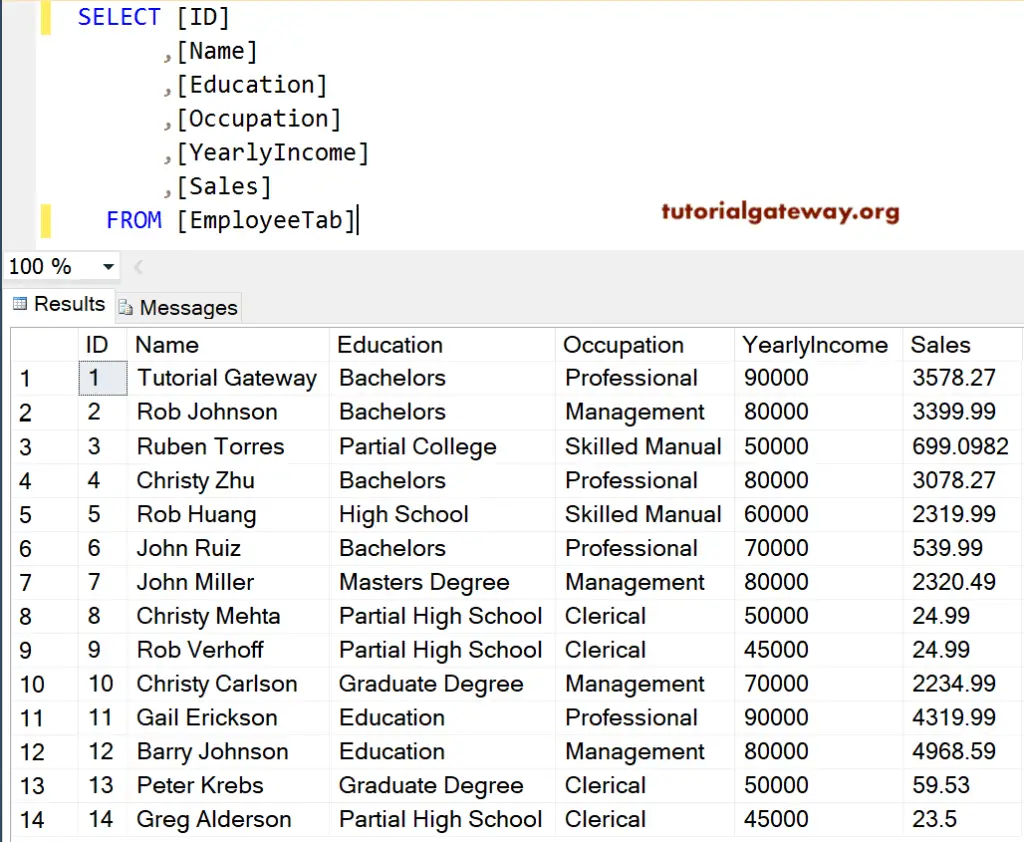
The SQL Server Static Cursors are always read-only because the result set will store in tempdb. You can use this SQL Server cursor to move both forward and backward. For this demonstration, we use the below-shown table, which holds 14 records.
SQL Server Cursor Scenario: In General, all the operations on the relational database work on a set of rows. For instance, Writing a Select statement returns all the records (result set) that satisfy the query condition. However, there are some situations where we have to work on a single row or a few row blocks. In this case, we can use the cursors.
Types of Cursors in SQL Server
The SQL Server supports four types of cursors.
- Static: It displays the records that were there when it was open. It will not show any updated, deleted, or inserted records after opening it.
- Forward-only: As the name suggests, it moves forward only and cannot be scrolled backward. These read-only cursors in SQL Server fetch rows serial-wise from start to end.
- Keyset: There are controlled by the keys or unique identifiers.
- Dynamic: These are opposite to the static and show the changes made from updated, deleted, or inserted after it is open.
- Fast_Forward.
Static Cursor in SQL Server Example
In this example, we will show you how to declare and open a SQL cursor. And here, we are using the syntax.
DECLARE empCR CURSOR STATIC
    FOR SELECT * FROM [EmployeeTab]
OPEN empCR
FETCH NEXT FROM empCR;
ANALYSIS
Within this example, the below statement will declare the SQL Server cursor statement for all the records in the Employee table.
DECLARE empCR CURSOR STATIC
FOR SELECT * FROM [EmployeeTab]
It will open the declared empCR.
OPEN empCR
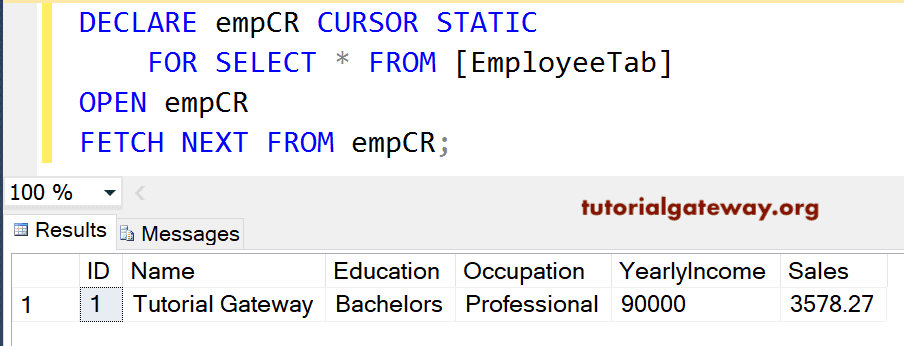
The next statement will fetch one row or return the next record from it.
FETCH NEXT FROM empCR;
Although the employee table has 14 records, it retrieves one record. It is because FETCH NEXT will fetch only one row from this SQL Server cursor, and if you want all, then use Loops.
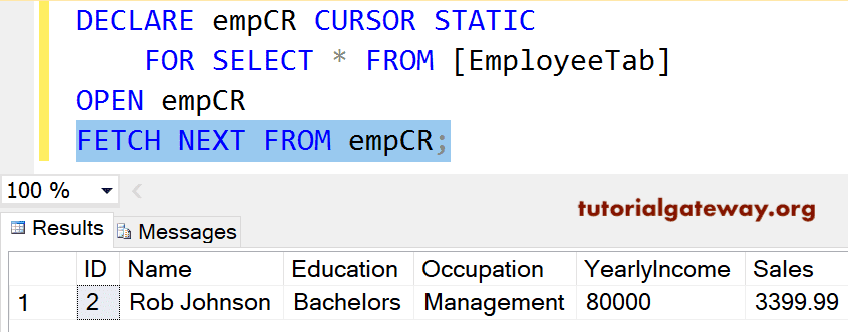
See it is retrieving the second record only. If you observe closely, we are selecting only the FETCH statement because our empCR is still in use since we haven’t closed or deallocated it.
Let me use the FETCH LAST option. It returns the last record present in our table, and that is ID number 14.
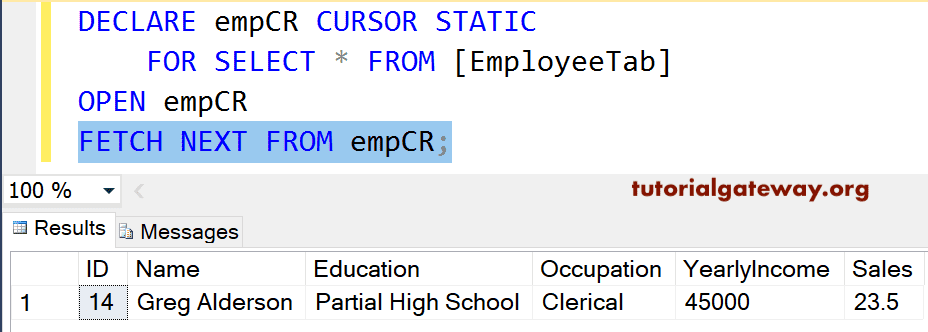
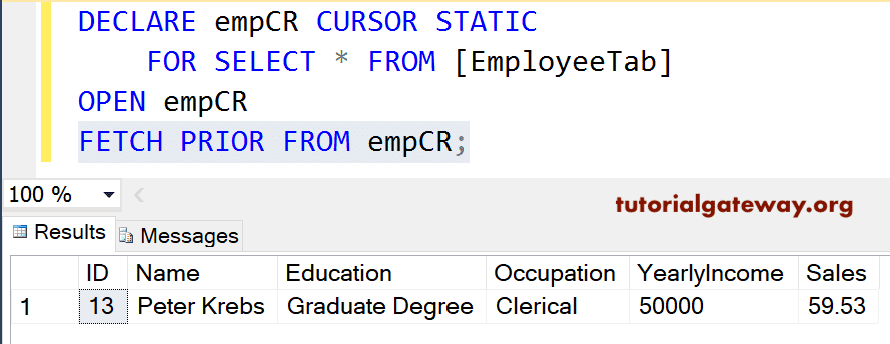
Next, we used the FETCH PRIOR option. It returns the row before the Last written record, and that is ID number 13 (before 14).
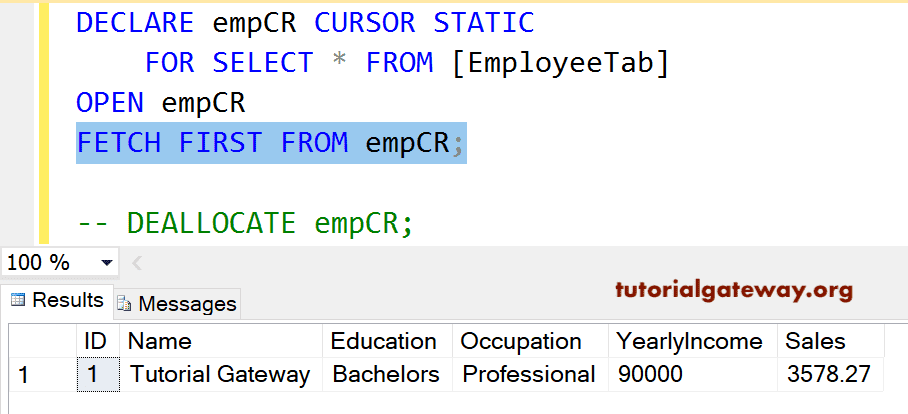
Lastly, we used the FETCH FIRST option. Returns the first record present in our table, and that is ID number 1.
SQL Server Cursor Example 2
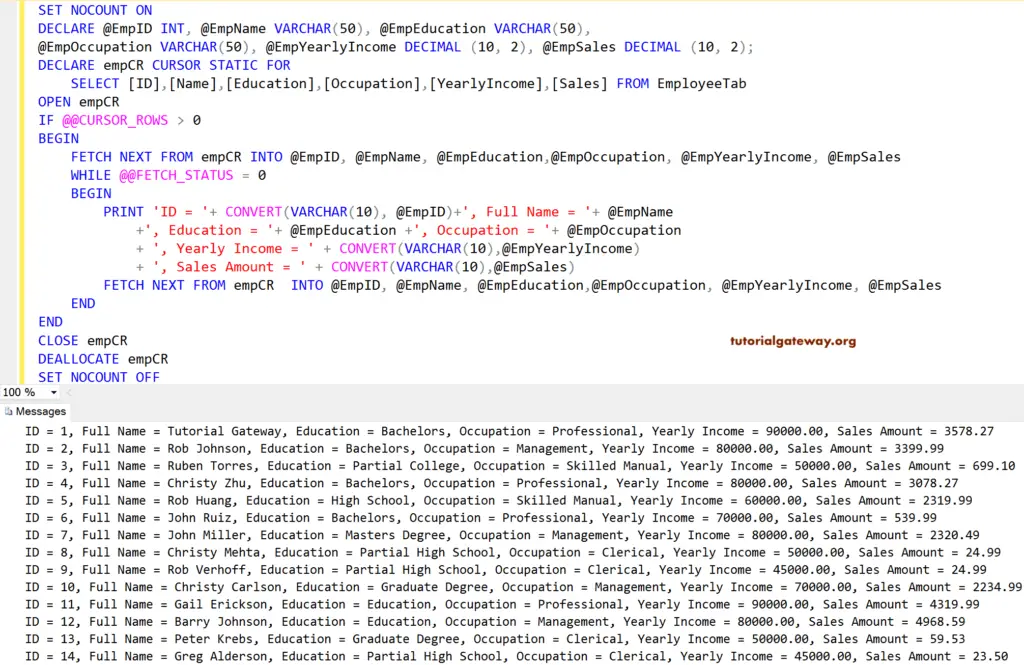
In our previous example, we have shown how it is fetching (or working) a single row at a time. In this example, we will use the WHILE LOOP to loop over the SQL Server cursor elements and print them as output.
SET NOCOUNT ON
-- Declaring the Variables
DECLARE @EmpID INT,
        @EmpName VARCHAR(50),
        @EmpEducation VARCHAR(50),
 @EmpOccupation VARCHAR(50),
 @EmpYearlyIncome DECIMAL (10, 2),
 @EmpSales DECIMAL (10, 2);

DECLARE empCR CURSOR
STATIC FOR
 SELECT [ID]
       ,[Name]
       ,[Education]
       ,[Occupation]
       ,[YearlyIncome]
       ,[Sales]
 FROM EmployeeTab

OPEN empCR
IF @@CURSOR_ROWS > 0
BEGIN
 FETCH NEXT FROM empCR
                  INTO @EmpID, @EmpName, @EmpEducation,
        @EmpOccupation, @EmpYearlyIncome, @EmpSales
 WHILE @@FETCH_STATUS = 0
 BEGIN
 PRINT 'ID = '+ CONVERT(VARCHAR(10), @EmpID)+', Full Name = '+ @EmpName
 +', Education = '+ @EmpEducation +', Occupation = '+ @EmpOccupation
 + ', Yearly Income = ' + CONVERT(VARCHAR(10),@EmpYearlyIncome)
 + ', Sales Amount = ' + CONVERT(VARCHAR(10),@EmpSales)

                FETCH NEXT FROM empCR
                              INTO @EmpID, @EmpName, @EmpEducation,
    @EmpOccupation, @EmpYearlyIncome, @EmpSales
 END
END
CLOSE empCR
DEALLOCATE empCR
SET NOCOUNT OFF
Within this example, First, we used SET NOCOUNT ON to stop the number of rows affected message from SQL Server Query. Next, we declared a few variables to hold the data coming from it.
Then, we declared and open the SQL cursor for all the records in the Employee table.
Next, we used the @@ within the IF Statement to check whether there were any rows in it or not.
The following statement will fetch the next record into already declared variables.
FETCH NEXT FROM empCR
           INTO @EmpID, @EmpName, @EmpEducation,
	       @EmpOccupation, @EmpYearlyIncome, @EmpSales
Next, we used the WHILE LOOP to loop over the elements. And within the loop, FETCH_STATUS is used to check the status of the FETCH statement. Within the Loop, we used the Print statement to print the records row by row.
PRINT 'ID = '+ CONVERT(VARCHAR(10), @EmpID)+', Full Name = '+ @EmpName
	+', Education = '+ @EmpEducation +', Occupation = '+ @EmpOccupation
	+ ', Yearly Income = ' + CONVERT(VARCHAR(10),@EmpYearlyIncome)
	+ ', Sales Amount = ' + CONVERT(VARCHAR(10),@EmpSales)
and then, we used the FETCH NEXT to get the next record from it.
FETCH NEXT FROM empCR
           INTO @EmpID, @EmpName, @EmpEducation,
	        @EmpOccupation, @EmpYearlyIncome, @EmpSales
Lastly, we used the CLOSE, and DEALLOCATE statements to close, and deallocate SQL cursor.
CLOSE empCR
DEALLOCATE empCR
SQL Server Cursor Example 3
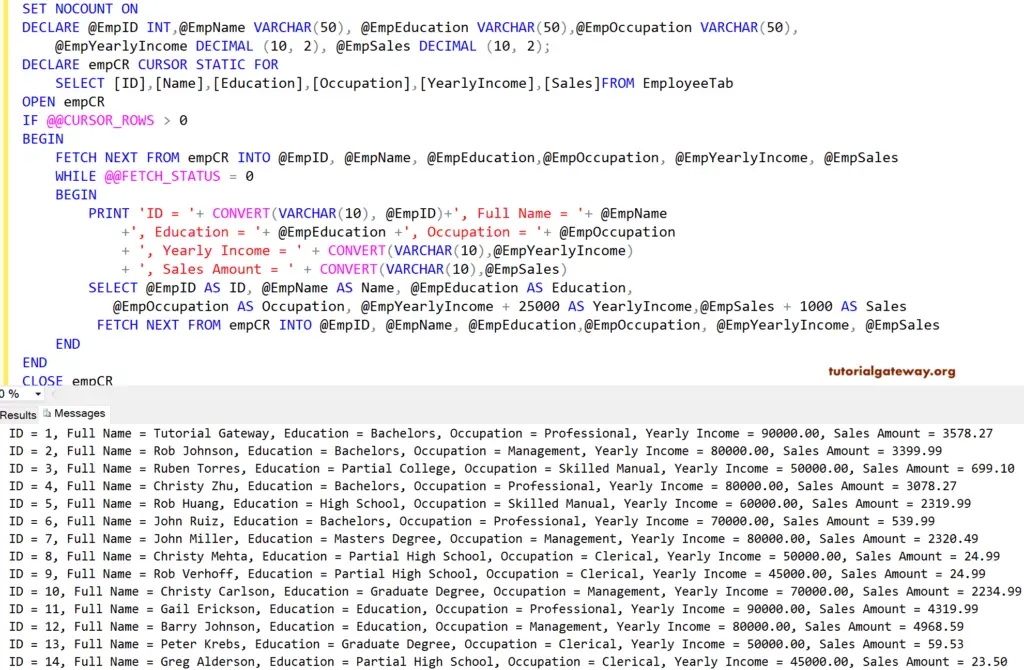
In our previous example of a SQL Server static cursor, we showed how to use the WHILE LOOP to loop over the elements and print them as output. In this example, we will add a select statement inside the while loop to display the items as the result set.
SET NOCOUNT ON
DECLARE @EmpID INT,
        @EmpName VARCHAR(50),
        @EmpEducation VARCHAR(50),
	@EmpOccupation VARCHAR(50),
	@EmpYearlyIncome DECIMAL (10, 2),
	@EmpSales DECIMAL (10, 2);

DECLARE empCR CURSOR
STATIC FOR
	SELECT [ID]
	      ,[Name]
	      ,[Education]
	      ,[Occupation]
	      ,[YearlyIncome]
	      ,[Sales]
	FROM EmployeeTab

OPEN empCR
IF @@CURSOR_ROWS > 0
BEGIN
	FETCH NEXT FROM empCR
                  INTO @EmpID, @EmpName, @EmpEducation,
		       @EmpOccupation, @EmpYearlyIncome, @EmpSales
	WHILE @@FETCH_STATUS = 0
	BEGIN
		PRINT 'ID = '+ CONVERT(VARCHAR(10), @EmpID)+', Full Name = '+ @EmpName
			+', Education = '+ @EmpEducation +', Occupation = '+ @EmpOccupation
			+ ', Yearly Income = ' + CONVERT(VARCHAR(10),@EmpYearlyIncome)
			+ ', Sales Amount = ' + CONVERT(VARCHAR(10),@EmpSales)

                -- Display the result set
                SELECT @EmpID AS ID, @EmpName AS Name, @EmpEducation AS Education,
		   @EmpOccupation AS Occupation, @EmpYearlyIncome + 25000 AS YearlyIncome,
                   @EmpSales + 1000 AS Sales

                FETCH NEXT FROM empCR
                              INTO @EmpID, @EmpName, @EmpEducation,
				   @EmpOccupation, @EmpYearlyIncome, @EmpSales
	END
END
CLOSE empCR
DEALLOCATE empCR
SET NOCOUNT OFF
It displays each record as a separate result set. And also, reflects the changes that we made (Yearly Income + 25000, Sales + 1000) in the SELECT Statement.
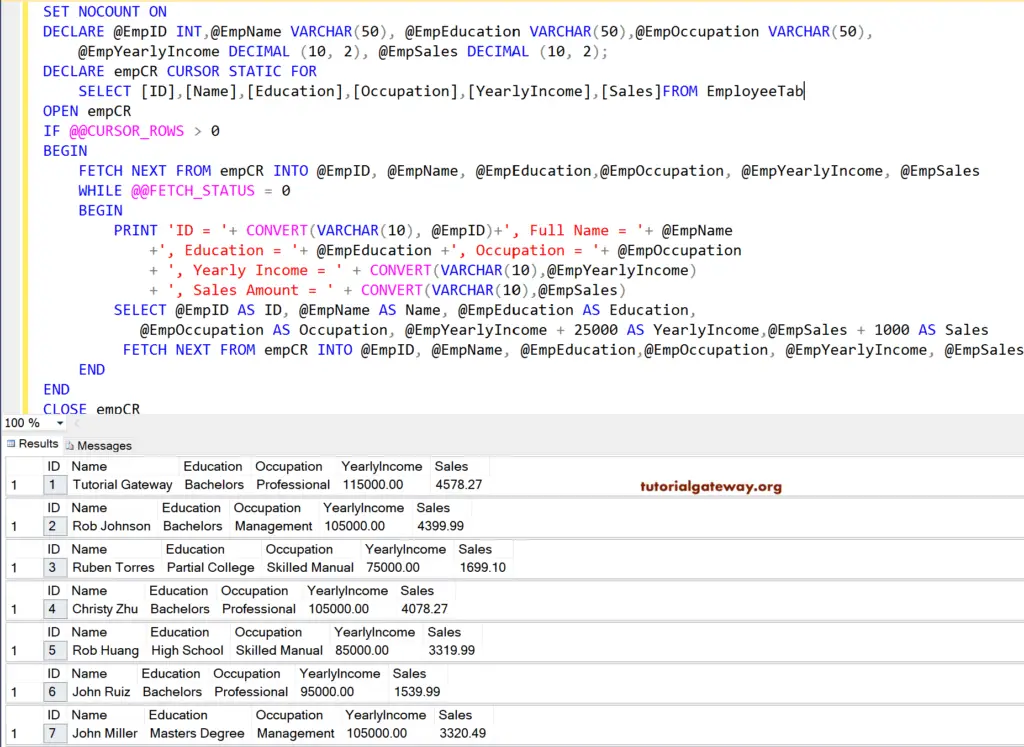
Let us see the Message tab to check the Print statement result of the SQL cursor. As you can see, it is displaying the Yearly Income and Sales values as it is in the Employee table. It is because we haven’t changed any value in the Print statement.
