The Lookup in SSIS is one of the most useful transformations, which is used to compare the source data to the existing data from the reference table (or Lookup Table) and find matching ones. This SSIS transformation allows you to perform data lookups. For the non-matching rows, we can further do some more work.
Case Sensitivity: Lookup Transformation in SSIS is Case-Sensitive, Kana-sensitive, and Accent-Sensitive. Lookup Transformation doesn’t matter, even if your source and destination database settings are case-insensitive. So, if your SSIS data is not in the proper case, it is advisable to convert your lookup table and source data to Uppercase or Lowercase. Please refer to the Transformation Case Sensitivity article for a better understanding.
SSIS Lookup Transformation Editor Options
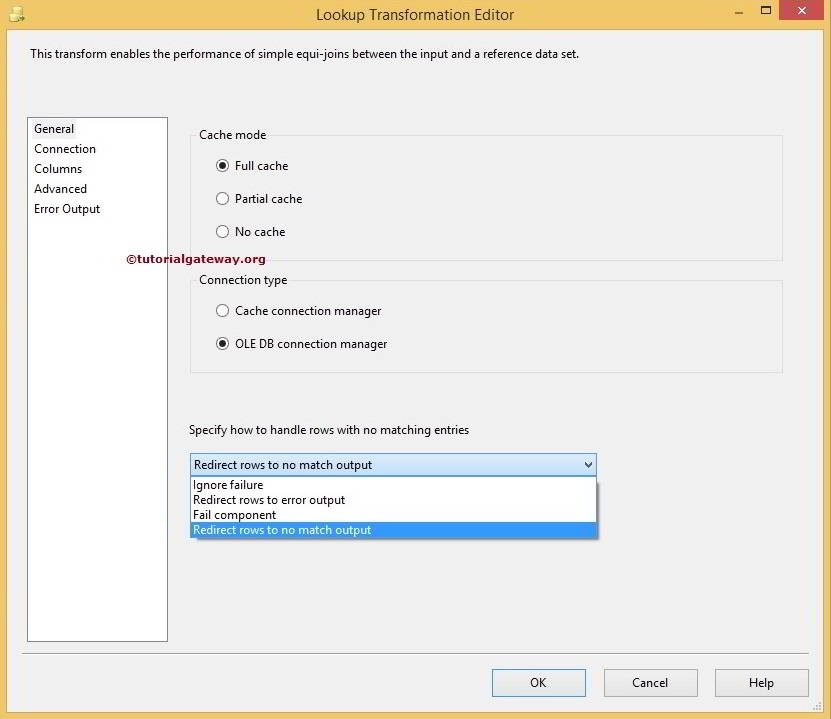
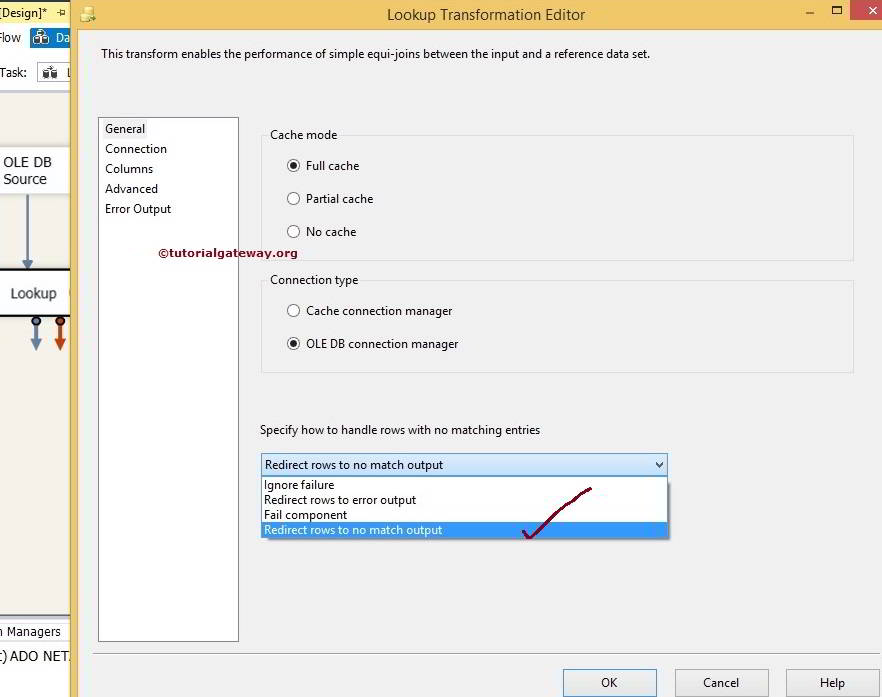
Double-click on the SSIS Lookup, which will open the Transformation Editor to configure it. The General page provides us with the options to set Cache Mode and Connection Type and Specify how to handle rows with no matching entries options.
Lookup supports only two types of Connection Managers:
- OLE DB Connection Manager: SSIS Lookup Transformation uses OLE DB Connection Manager to access the reference table present in the SQL Server, Oracle, and DB2. Please refer to the Lookup Transformation section to understand How to configure Lookup Transformation using the OLE DB Connection Manager.
- Cache Connection Manager: SSIS Lookup default uses the OLE DB Connection Manager to connect with the reference table. Other sources can be used, but they must be used indirectly via a Cache Transformation. For example, using the Cache Connection Manager, we can use a Text or Excel file as a lookup table. Please refer to the Transformation in Full Cache Mode article to understand How to configure Lookup Transformation using the Cache Connection Manager. For more Transformations >> Click Here.
SSIS Lookup Transformation Cache Mode
You have three options for SSIS Lookup cache mode:
- Full Cache mode: This is the most commonly used approach in the Lookup Transformation. If we selected this option, the entire lookup (or reference) table would preload into the cache (Memory). Transformation will perform a lookup from the Memory instead of the Dataset. It works well when we have less number of rows in the lookup table.
- Partial Cache mode: SSIS Lookup Transformation starts the transformation with an empty cache if we select this option. When a new row comes from the data flow, the Lookup Transformation first checks for the matching values in its cache. It will check the lookup table if it is not found in the cache. If no match is found, it queries the lookup table. If the match is located in the table, the value is cached (stored in the memory) for the next time. If the lookup table is massive, we can use this approach.
- No Cache mode: If we select this option, the Lookup Transformation will not use the cache to store the lookup table at any stage. When a new row comes from the data flow, it directly checks in the lookup table for matching values.
Error Handling in SSIS Lookup
The final option on this page is to specify How to handle rows with no matching entries. The SSIS Lookup Transformation provides you with four options:
- Fail Component (Default): When a new row passes from the data flow to lookup. It will fail the package if it doesn’t find any matching row in the lookup table.
- Ignore Failure: If we selected this option, When a new row passed from the data flow, the Lookup Transformation would continue its processing even though it doesn’t find any matching row in the lookup table.
- Redirect Rows to No Match Output: If we select this option, Lookup Transformation will direct the rows that don’t match the row in the lookup table to No Match. In real-time, we mostly use this option.
- Redirect Rows to Error Output: If we select this option, SSIS Lookup Transformation will direct the rows that don’t find any matching row in the lookup table to the standard error output.
TIP: Within the Advanced page, we adjust the caching properties of the Lookup Transformation.
SSIS Lookup Transformation Example
This section will explain how to perform Lookup Transformation in SSIS using OLE DB Connection Manager with an example. In this example, we will use the OLE-DB Connection to connect with SQL Server and perform the lookup transformation operation.
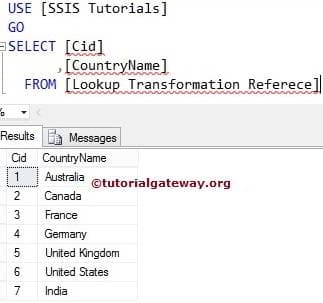
Before creating the lookup transformation package, Let us see the table and its data.
Now, let’s see the source data as well.

Configure Lookup Transformation in SSIS
STEP 1: Drag and drop the Data Flow Task from the toolbox to the control flow region. Next, rename it Lookup Transformation.
Double-click on it, and it will open the data flow tab.
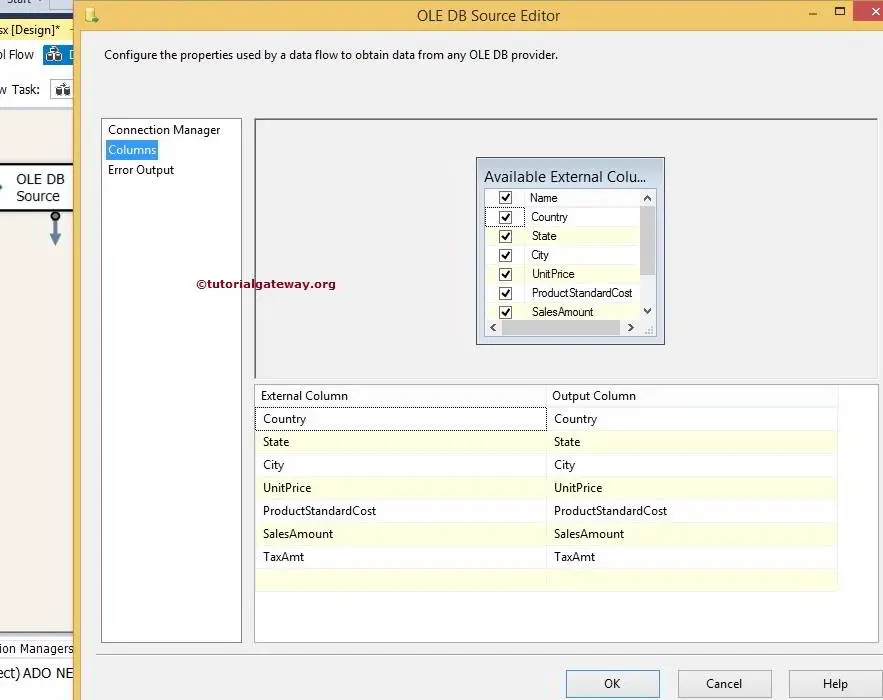
STEP 2: Drag and drop OLE DB Source from the toolbox to the data flow region. Double-click the OLE DB Source in the data flow region to open the connection manager settings.
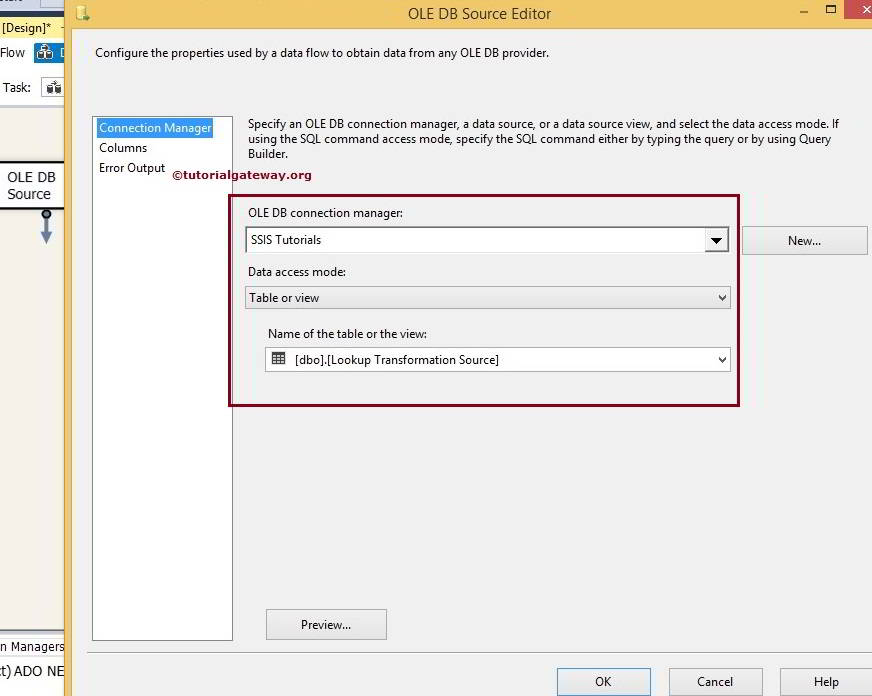
From the above screenshot, you can observe that We selected the following Database in our SQL Server as a source database and [Source] as the source table
STEP 3: Click on the columns tab to verify the columns. In this tab, we can uncheck the unwanted columns also.
Click OK and Drag the SSIS Lookup Transformation from the toolbox to the Data Flow tab.
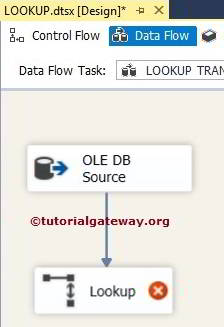
STEP 4: Double click on the Lookup Transformation will open the Editor. Use this to configure the lookup table (reference table).
In the SSIS lookup transformation General Tab, “Specify how to handle rows with no matching entries.” Change the default Fail Component to Redirect rows to no match output option. Change this option to redirect all the unmatched rows to the No Match output. Otherwise, the package will Fail.
Under the SSIS Lookup Transformation connection type section, we selected the OLE DB Connection manager because we use this table as a reference.
If you use any cache file (.caw), use the Cache Connection Manager. Please refer to the Full Cache Mode article to understand How to perform these operations using a Cache File.
Click on the connection Tab of the SSIS lookup transformation
STEP 5: If you already created the OLE DB connection manager, select it from the list; otherwise, please click the New button to configure it. Here we decided on the Tutorials Database.
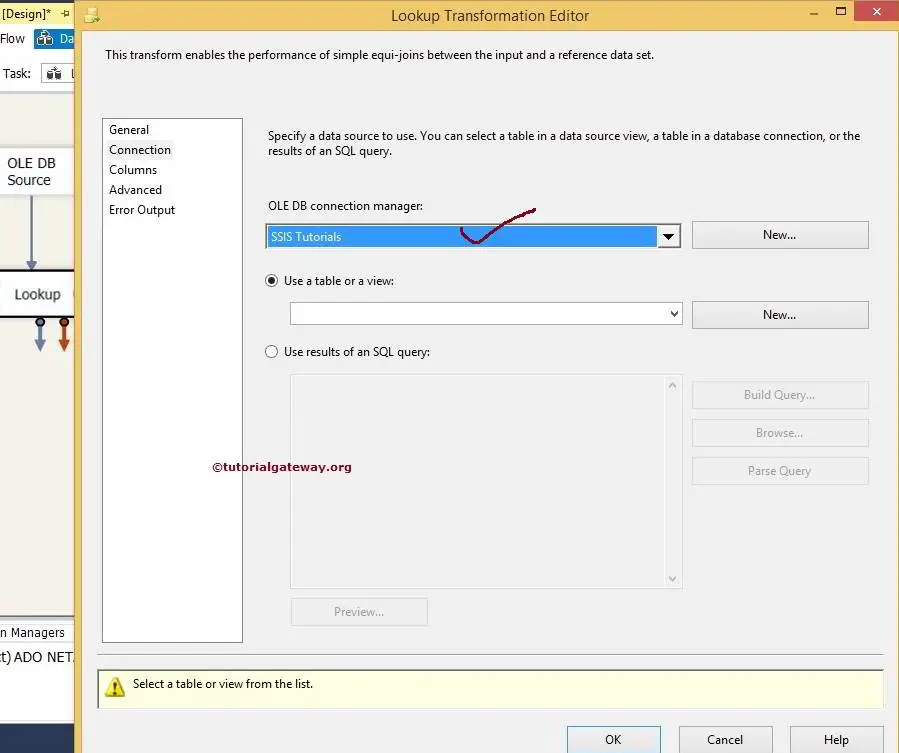
For this example, we use the Reference table as the lookup or reference table. Therefore, source data will be compared with the data presented in this table.
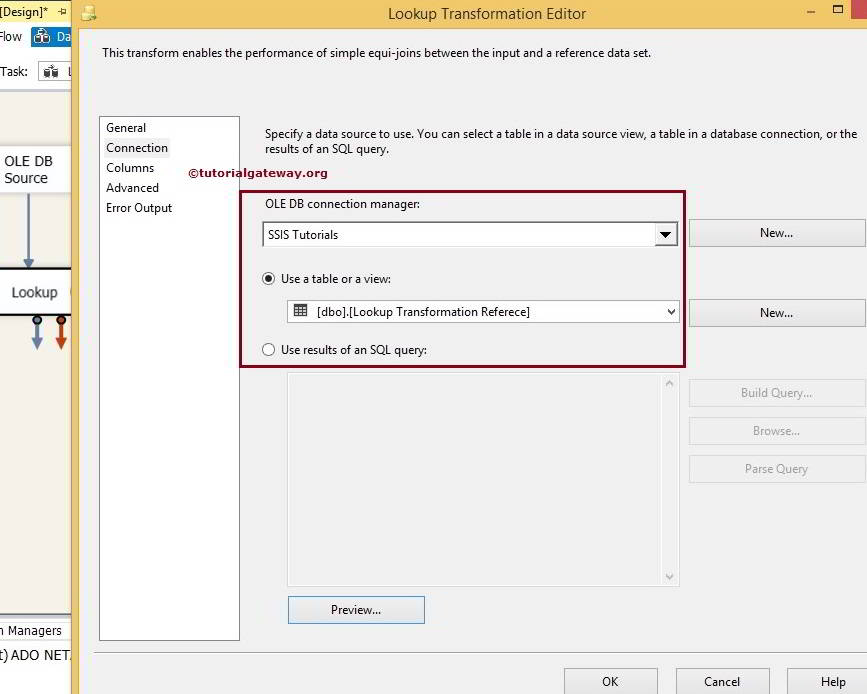
TIP: We should not use the whole table as a reference for lookup. Perhaps you should use the command to select the required column name you want to reference.
STEP 6: Click on the Available SSIS Lookup Transformation Input columns. Drag to the available lookup columns to create a join between the 2 data sets.
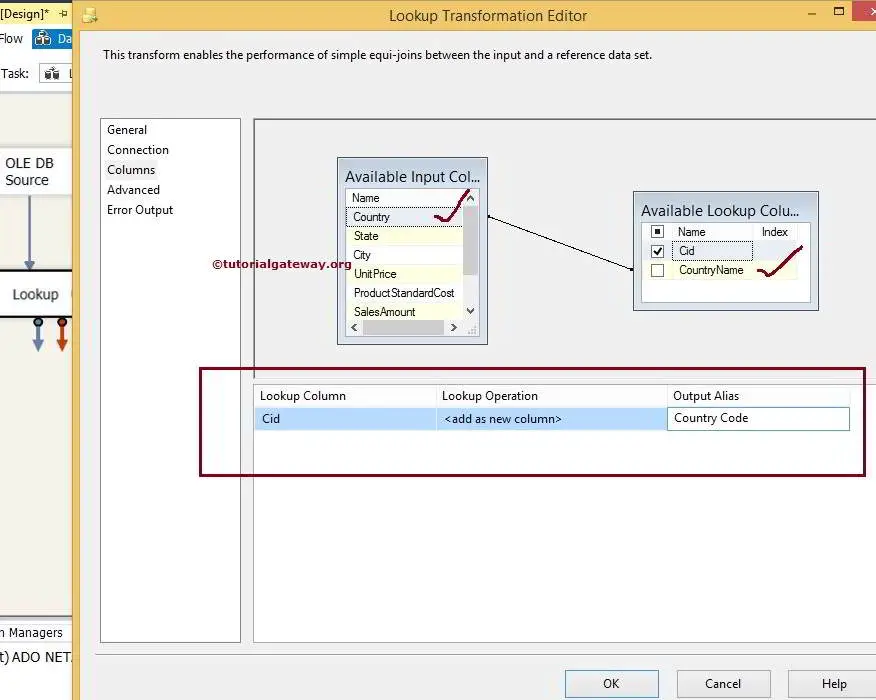
A country column in the source data will check against the [Country Name] column in the lookup table.
- If each row of the Country column in the source data matches with any of one row of the lookup table [Country Name] column, that row will pass to the Matched Output.
- If it does not match with any of one row of the [Country Name] column in the lookup table, then that row will pass to No Match Output.
Sometimes, we may have extra columns in the SSIS lookup table that we want to pass to the matched output. In these situations, we have to checkmark that column in the Available Lookup Columns as we did for the Cid column.
STEP 7: Drag and drop two OLE DB Destinations onto the data flow region. And then, drag the Output Arrow to this new OLE-DB Destination. A popup window, the Input Output Selection window, will appear, prompting you to select the Input-Output type. Either you can choose Lookup Match Output or No Match Output. Select Lookup Match Output and click OK.
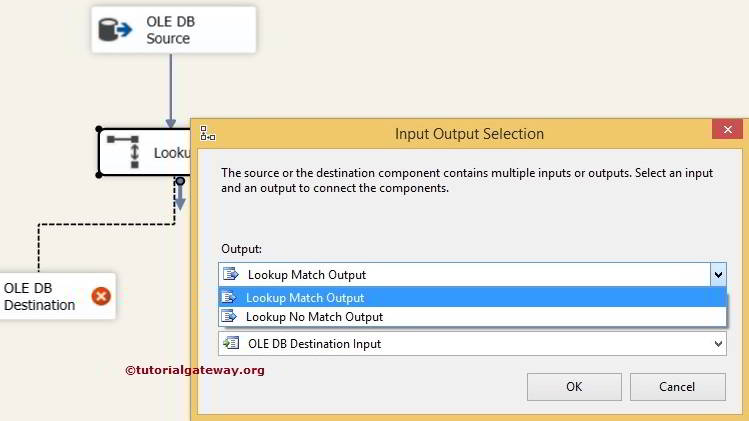
When you drag another Output Arrow to OLE DB Destination 1, it automatically allocates Lookup No Match Output.
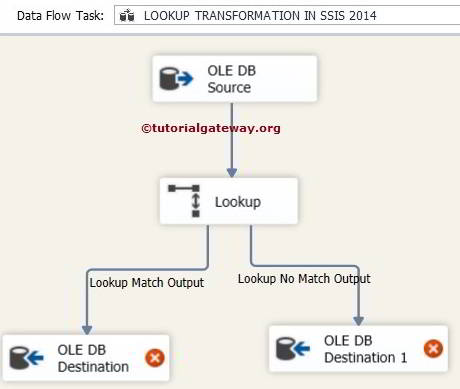
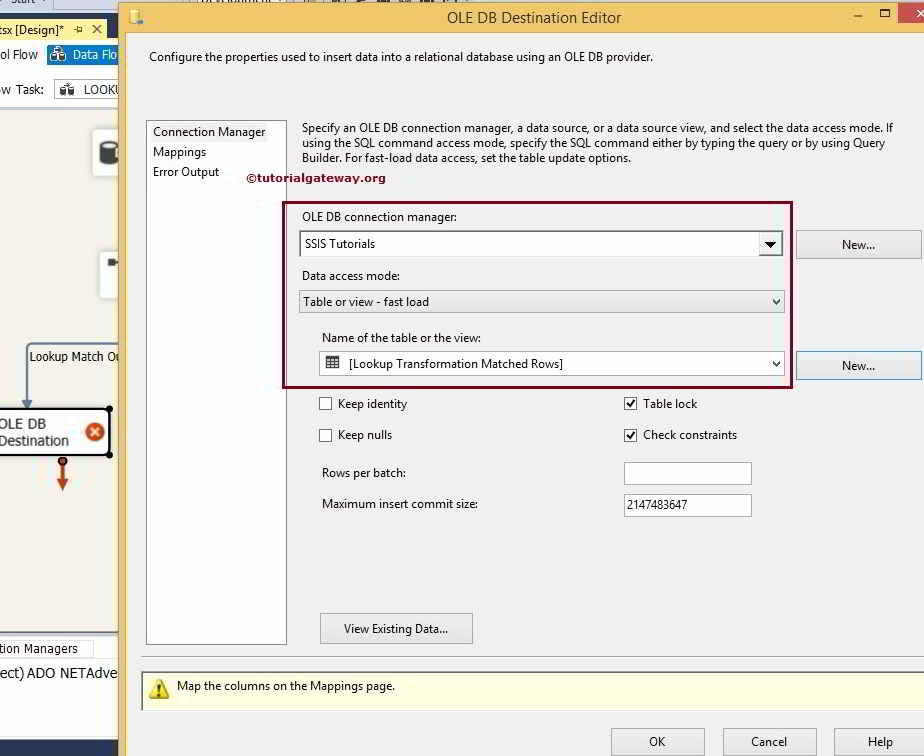
STEP 8: Double-click on OLE DB Destination and open the Editor. Select the OLE-DB Connection Manager and the [Matched Rows] table in the Database to store the Matched Rows Data.
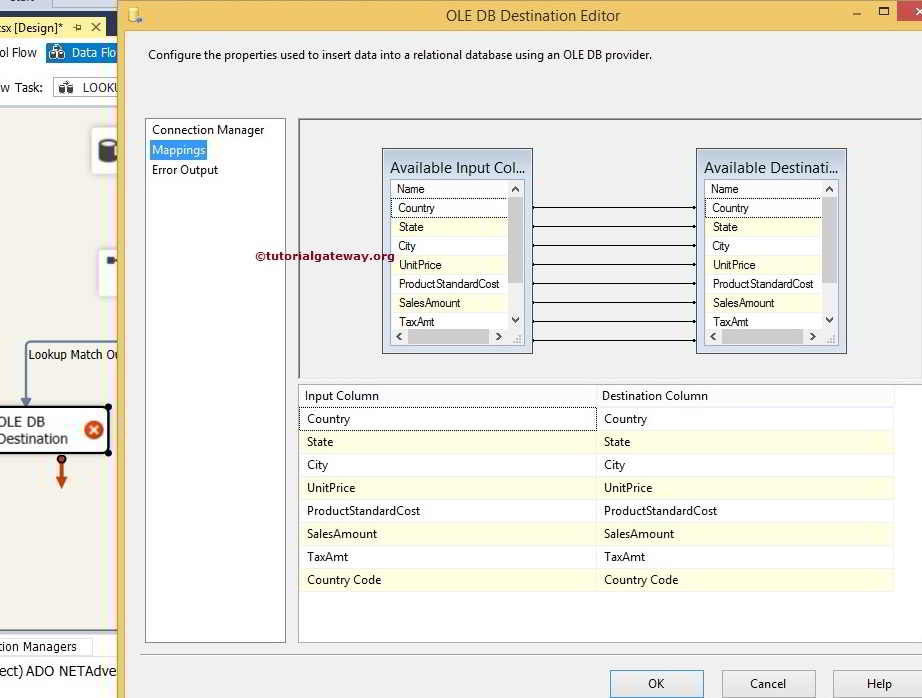
STEP 9: Click the Mappings tab to check whether the SSIS Lookup Transformation source columns are correctly mapped to the destination columns.
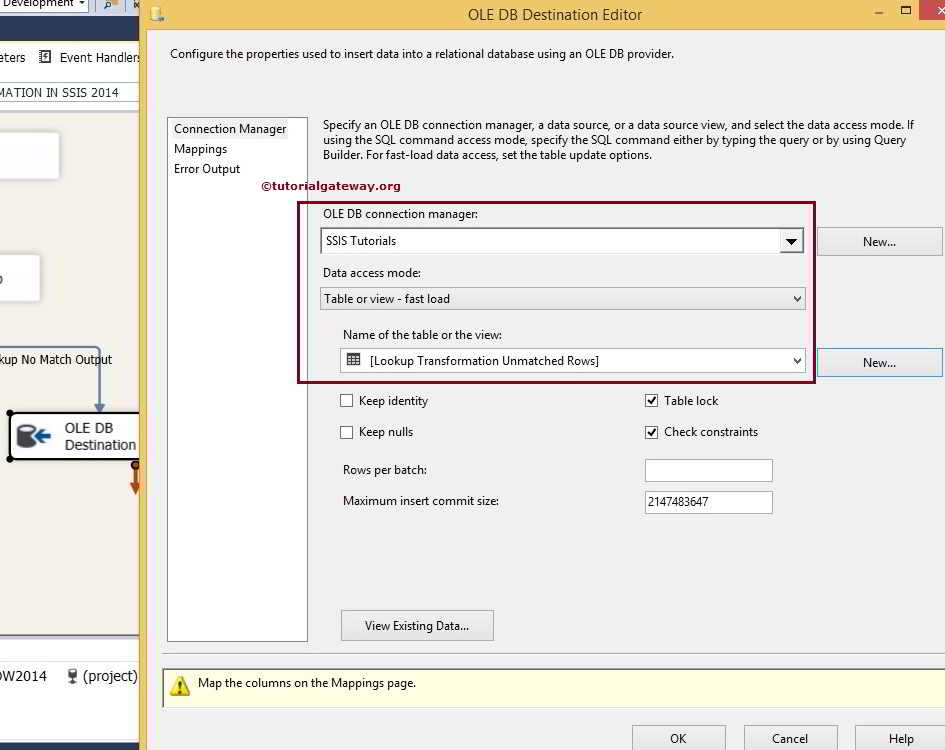
STEP 10: Now, Double click on the OLE DB Destination 1 to configure the No Match output. Here, we will select the [Unmatched Rows] table in the Database to store the Not Matched Row Data.
Repeat STEP 9 and click OK to finish creating a Lookup Transformation Package.
Right-click the Lookup Transformation in SSIS Package in the Solution Explorer and select the Execute Package.
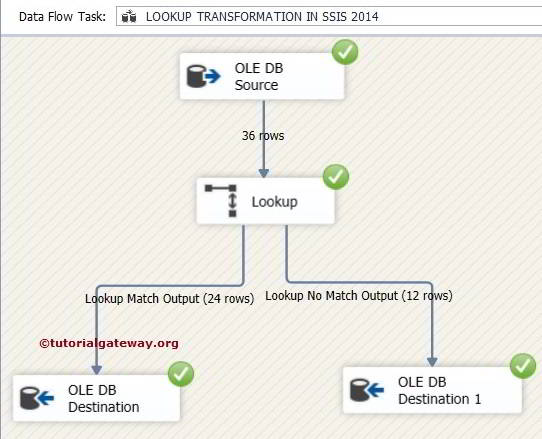
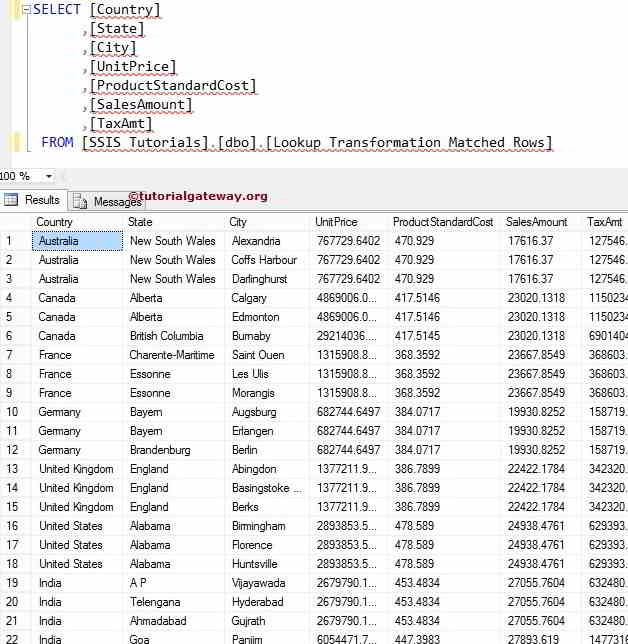
As you can observe, our SSIS Lookup Transformation Package executes successfully. Let’s open the Management Studio to view the Matched Rows data.
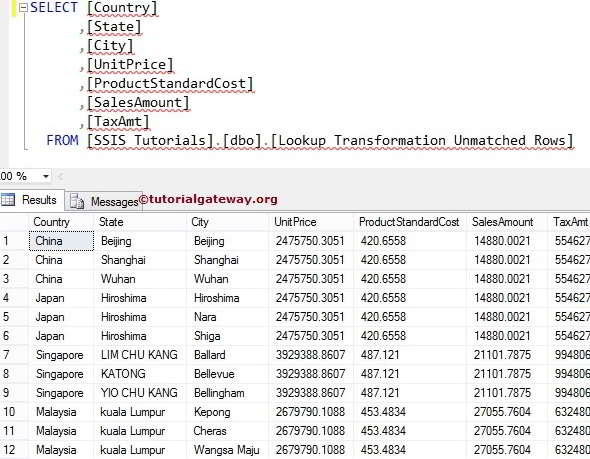
Let’s see the Lookup Transformation Unmatched Rows Data.
Comments are closed.