In SQL Server, once the database is created, the next step is to create a new table. It is the first and most important step because, as we all know, it is the place where we store and manage data. For this, we have to use the SQL Server CREATE TABLE Statement followed by the unique name, parentheses (). Within the (), specify the columns and data types. The other option is using the Management Studio table designer.
The table is a combination of rows and columns, and each column is a combination of a data type and constraints. The SQL CREATE TABLE statement is a Data Definition Language (DDL) statement, and table structure includes column names (headers), rows (actual data for each column), data types (defining the data), constraints (rules and relationships), NULL, and NOT NULL values. Once we have a table with proper data, we can use the SELECT statement with all combinations to query the data, perform calculations, and so on.
TIP: Table Name accepts a maximum of 128 characters, and the maximum number of columns a table can allow is 1024.
SQL CREATE TABLE Syntax
The basic syntax of the CREATE TABLE is as shown below. In the following sections, we will show the complex one.
CREATE TABLE [db].[schema].[TableName]
(
    Column_Name1 Data_Type(Size) [NULL | NOT NULL],
    Column_Name2 Data_Type(Size) [NULL | NOT NULL],
     …
    Column_NameN Data_Type(Size) [NULL | NOT NULL]
);
NOTE: When we execute the SQL CREATE TABLE statement, it doesn’t return any result set. However, if the structure is valid, it will create a new table with the given name inside the specified database.
Permission: It requires CREATE TABLE permission at the database level and ALTER TABLE permission at the SCHEMA level.
The SQL Server CREATE TABLE syntax items.
- CREATE TABLE keyword tells the server to create a new table.
- Db (optional): The database name where we want to create this table.
- Schema (optional): Either use the default dbo schema or mention your own or an existing schema. For example, sales, products, hr, etc.
- TableName: The name of the SQL Server table that you want to create, and it should reflect the data it holds. It should be unique to a database, and if you write an already existing name, it will throw an error.
- Column_Name: Names from 1 to N are the unique columns in the table. Within the script, we must use a comma to separate each column. The table follows the same order that we mentioned here.
- Data Type: Please provide a valid Data type from the available ones. It specifies the type of data that the column will hold. For example, INT, FLOAT, MONEY, VARCHAR, NVARCHAR, or DATETIME.
- Size: Data types like VARCHAR, NVARCHAR, CHAR, and NCHAR expect the size. So, please provide a valid integer number here.
- NULL or NOT NULL: If you select the NULL option (default), then the column will accept both normal values and NULL values. Otherwise (NOT NULL), it will throw an error saying that the Column should not be empty. SO, NOT NULL won’t accept any NULL values.
NOTE: Apart from the ones mentioned above, there are constraints (Primary, Default, Check, Foreign, and Unique), identity columns, and others that we will explore in a later section.
SQL CREATE TABLE Example
When creating a table, there are an enormous number of options, including adding constraints, identity columns, NULLS, etc. So, we start with the basic one and move to the advanced ones.
Let me show you a practical example of creating a simple table to understand the syntax better. In this example, we create a new Customer table inside the Database to store the customer’s information.
From the SQL Server code below, you can observe that the CREATE TABLE statement is followed by [Test].[dbo].[Customer]. Here,
- Test is the database name (optional). If you ignore the database name, the Server will consider the current database that you can see in the top left side of the toolbar.
- dbo (optional): For all the database users, when creating a table, dbo is the default schema. However, you can use your own schema, such as HR, Sales, etc, as per the requirements.
- Customer: Table name.
Next, we declared 5 Columns inside our newly created table to cover some of the basic SQL data types that we use in real-time. If you notice, each column, along with its respective data type, is defined within the parentheses.
- Our first column is CustomerKey of the Integer data type, and it will not allow NULL values. Here, NOT NULL means it won’t allow NULLS, and you can’t insert them.
- The name column belongs to the VARCHAR data type, allowing NULL values. We also assigned the size to 150, which means the Name column will accept up to 150 characters.
- The third column is the DateOfBirth of the DATE data type and allows NULLs. This will allow for entering Date values only.
- EmailAddress and Profession columns belong to the NVARCHAR data type, and they will allow NULL values.
CREATE TABLE [Test].[dbo].[Customer]
(
  [CustomerKey] [int] NOT NULL,
  [Name] [varchar](150) NULL,
  [DateOfBirth] [date] NULL,
  [EmailAddress] [nvarchar](100) NULL,
  [Profession] [nvarchar](100) NULL
)
GO
Once you have written the above, click the execute button to run this SQL Server CREATE TABLE command.
Messages
-------
Command(s) completed successfully.
As you can see from the above message, the command is executed successfully. You can view the newly created table in the object explorer.
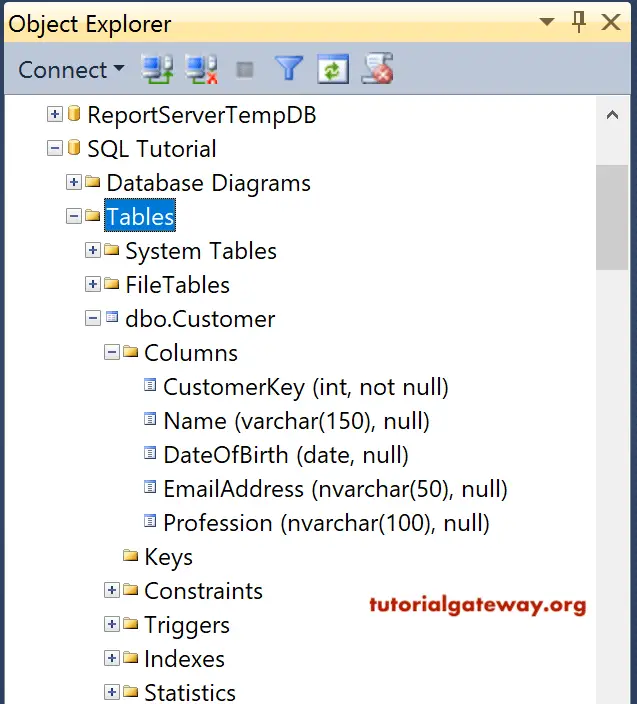
To do so, within the SQL Management Studio Object Explorer, expand the Database where you have created a table. Next, please expand the Tables folder to see the newly created one. If you didn’t find it, please click on the refresh button in Object Explorer. To find the available columns, expand the Columns folder under the Customer table.
NOTE: The above code will create an empty table. There will be no data inside it.
Once the table is created, the next step is to insert some records into it. We have already written a new article that explains both INSERT and INSERT INTO SELECT statements. However, you can use the SELECT statement to see the newly created empty table.
SELECT * FROM Customer;
The following query helps to find the information about the created table name, columns, data types, and more. Please replace the ‘TableName’ with the actual table name.
SELECT TABLE_NAME, COLUMN_NAME,
DATA_TYPE, IS_NULLABLE, COLUMN_DEFAULT
FROM INFORMATION_SCHEMA.COLUMNS
WHERE TABLE_NAME = 'TableName';
Use the code below for constraints information.
SELECT tc.CONSTRAINT_NAME, tc.CONSTRAINT_TYPE,
kc.COLUMN_NAME
FROM INFORMATION_SCHEMA.TABLE_CONSTRAINTS AS tc
JOIN INFORMATION_SCHEMA.KEY_COLUMN_USAGE AS kc
    ON tc.CONSTRAINT_NAME = kc.CONSTRAINT_NAME
WHERE tc.TABLE_NAME = 'TableName';
SQL CREATE TABLE IF NOT EXISTS
Before creating a table in the Server, it is always advisable to check if it already exists or not. Because when you try to use an already existing table name (duplicate name), the server will throw an error.
For example, we have already created the Customer table in the first example. If you use the name with different column names, the server will throw an error. There are multiple ways to avoid this error, and this example uses IF OBJECT_ID, which is the most commonly used one.
Here, the OBJECT_ID looks for the employees table with the dbo schema. If it is NULL, it means no SQL table exists with that name, so create a new one. Otherwise, it won’t.
IF OBJECT_ID('dbo.employees', 'U') IS NULL
BEGIN
    CREATE TABLE dbo.employees
    (
        ID INT NOT NULL,
        FullName NVARCHAR(150)
    );
END
If you want to provide meaningful information if the table exists, use the ELSE statement by adding the code below to the end of the above query.
ELSE
 BEGIN
   PRINT 'Table Already Exists'
 END
There are situations where we may have to delete existing old tables and create new ones. In such a case, use the DROP TABLE IF EXISTS statement. It will delete if there is any existing table name of employees. Next, the SQL CREATE TABLE statement will create a new empty table.
DROP TABLE IF EXISTS dbo.employees;
CREATE TABLE dbo.employees
    (
        ID INT NOT NULL,
        Name NVARCHAR(150)
    );
SQL CREATE TABLE with IDENTITY Column: auto increment ID
When creating a table, constraints play a crucial role and enforce data integrity. They will define the rules on columns, such as what type of data it accepts, how the relationship with other tables happens, etc.
In this section, we will incorporate all the available constraints to explain how we can use them when a new table is created. There are dedicated articles about each one of them, so please click the blue hyperlinks to view them in detail.
I suggest referring to the Primary Key, foreign key, Unique Key, Default Constraint, and Check Constraint articles.
In this example, we create a table with an identity column. For this, we defined the Customer Key column as an Identity column. This will auto-generate integer numbers starting with 1 and incrementing by 1. (This is optional. If you want, you can remove the IDENTITY (1, 1) portion completely.)
CREATE TABLE [CustomerIdentity]
(
  [CustomerKey] [int] IDENTITY(1,1) NOT NULL,
  [FirstName] [varchar](50) NULL,
  [LastName] [varchar](50) NOT NULL,
  [BirthDate] [date] NULL,
  [EmailAddress] [nvarchar](100) NOT NULL,
  [Yearly Income] [money] NULL,
  [Profession] [nvarchar](100) NULL
)
GO
SQL CREATE TABLE with the Primary Key
The PRIMARY KEY constraint is the most important key, and every table must have one. The primary key identifies each record as a unique one, and it won’t allow any NULL values. When you create a primary key, the server will automatically create a clustered index on that column.
We can define one or more columns as primary keys, and it finds the relationship between this table and the dependent table with a foreign key. To keep the example simple, we will create a new table with two columns and set one of them as the PRIMARY KEY.
To create a table with a Primary Key, we just added the SQL PRIMARY KEY keyword to the Department_id column. Here, the Department_id accepts integer values, and because of the primary key, it allows unique values that are not NULL.
CREATE TABLE department (
	Department_id INT PRIMARY KEY,
	Department_Name VARCHAR(100) NOT NULL
);
Please go to the Object Explorer and expand the Database folder -> Table Name -> Columns. Next, if you expand the Keys, Constraints, and Indexes folder in Object Explorer, you can see all these available constraints.
TIP: We can also add IDENTITY(1,1) between INT and PRIMARY KEY in the first column. It automatically adds a new number for a new record. We don’t have to insert any value for the Department_id.
SQL CREATE TABLE with FOREIGN KEY
A foreign key creates a link between the two tables. It basically refers to the primary key on the other table to establish a connection between the two tables. Because of this relationship, the column declared with a foreign key won’t allow any update or delete operations that will break the relation with the parent table.
The query below will create a new table (employee) with four columns. Here, Emp_id is the identity column with a primary key constraint. Next, the Department_id is the FOREIGN KEY referencing the Department_id in the department table that we created previously.
CREATE TABLE employee (
	Emp_id INT IDENTITY(1,1) PRIMARY KEY,
	Name VARCHAR(100) NOT NULL,
	Salary MONEY,
Department_id INT,
	FOREIGN KEY (Department_id) REFERENCES department(Department_id)
);
SQL CREATE TABLE with CHECK Constraint
The CHECK constraints help to enforce rules on the column data. For example, allowing the user to enter a particular kind of data. The example below creates a user table with two columns, where the Age column uses the CHECK constraint to check whether the user’s age is greater than or equal to 18. If TRUE, then only the record will be inserted into a table. Otherwise, it won’t.
CREATE TABLE Users (
    UserID INT PRIMARY KEY,
    Age INT CHECK (Age >= 18)
);
SQL CREATE TABLE with UNIQUE Constraint
The UNIQUE key won’t allow the user to enter duplicate values into that column. For instance, each customer or employee must have unique login details. So, when entering details into these columns, we must use the UNIQUE key when creating a table.
CREATE TABLE [LogDetails]
(
  [ID] [int] IDENTITY(1,1) NOT NULL,
  [LoginID] [NVARCHAR](150) NOT NULL UNIQUE
)
SQL CREATE TABLE with DEFAULT Constraint
The default constraints are helpful in auto-filling the record with the mentioned value and they are useful when creating a new table. In the query below, there is a Country column with a default value of USA and a HireDate column with the GETDATE() function. It means if you fail to pass the Country name in the INSERT statement, instead of a NULL value, it auto-fills with USA. Similarly, if you miss the HireDate value, it auto-fills with the current date and time.
CREATE TABLE [DefaultCustomer]
(
  [ID] [int] IDENTITY(1,1) PRIMARY KEY NOT NULL,
  [Name] [VARCHAR](150) NOT NULL,
  [EmailAddress] [nvarchar](100) NOT NULL,
  [Country] [NVARCHAR](100) DEFAULT 'USA',
 [HireDate] [DATETIME] DEFAULT GETDATE(),
)
GO
SQL CREATE TABLE with NOT NULL Constraint
As we mentioned earlier, when we create a table, if we use the NOT NULL constraint after any column, then that column won’t allow any NULL values. In real time, there are many columns where we must prevent users from entering NULL values.
For example, email address, HireDate, or date of birth, etc. In all these scenarios, use NOT NULL Constraint. In the query below, all three ID, FullName, and Email columns use the NOT NULL constraint, so all three of them won’t allow NULLs.
CREATE TABLE dbo.employeesNotNull
(
    ID INT NOT NULL,
    FullName VARCHAR(150) NOT NULL,
	Email NVARCHAR(100) NOT NULL
);
Example: SQL CREATE TABLE with all Constraints
We will combine all the keys in a single table to show the data integrity. The CREATE TABLE statement helps to create a new Customer11111 table with an Identity Column, Primary Key constraint, Unique Key, and Check Constraint columns.
- The Last Name will accept Unique values.
- If the user doesn’t provide a value to the Profession column, then it writes Software Developer as the default value.
- Check constraint: check whether the Age value is between 18 and 70.
CREATE TABLE [Customer11111]
(
  [ID] [int] IDENTITY(1,1) NOT NULL,
  [CustomerKey] [int] NOT NULL PRIMARY KEY,
  [FirstName] [varchar](50) NOT NULL ,
  [LastName] [varchar](50) NOT NULL UNIQUE,
  [Age] [int] NULL,
  [EmailAddress] [nvarchar](50) NULL,
  [Yearly Income] [money] NULL,
  [Profession] [nvarchar](100) NOT NULL DEFAULT ('Software Developer'),
  CONSTRAINT CK_Customer11111_Age CHECK([Age] > 18 AND [Age] <= 70)
)
GO
SQL Create a Table from Another
Unlike others, SQL Server does not have a CREATE TABLE AS SELECT command to duplicate an entire table or part of an existing table. However, it provides a SELECT INTO Statement to create a table using an existing one, along with data (if any). To demonstrate the same, we use the DimProductCategory from the AdventureWorksDW2022 database.
To copy all the columns from the DimProductCategory table, you must use the query below.
SELECT *
    INTO [Test].[dbo].ProductCategory
FROM [AdventureWorksDW2022].[dbo].[DimProductCategory]
For now, we only need two columns, and they are [ProductCategoryKey] and [EnglishProductCategoryName]. The query below creates the ProductCategory table using the DimProductCategory definition and inserts all the records present in it.
SELECT [ProductCategoryKey]
      ,[EnglishProductCategoryName] AS ProductCategoryName
  INTO [Test].[dbo].ProductCategory
  FROM [AdventureWorksDW2022].[dbo].[DimProductCategory]
Please use the query below to view the newly created table and its contents.
SELECT * FROM ProductCategory

If you intend to create a new table from the existing structure (without data), please add the following SQL WHERE clause code at the end of the above query. As the condition always fails, it copies the DimProductCategory definition, but it will ignore the records.
WHERE 1 = 0
NOTE: We have a dedicated article to create both Clustered Index and Non-Clustered Index. So, please refer them to understand indexing columns.
Create SQL Local and Global Temporary Tables
There are two types, global and local temp tables, which are stored under the system tempdb database. So, they load significantly faster compared to regular tables.
In this example, we create local and global temporary or temp tables. For more information, please refer to the Temporary article.
-- Local Temp
CREATE TABLE #LocalTemp
(
 [ID] [int] IDENTITY(1,1) NOT NULL,
 [Name] [nvarchar](255) NULL,
 [Sales] [float] NULL
)
GO

-- Global Temp
CREATE TABLE ##GlobalTemp
(
 [ID] [int] IDENTITY(1,1) NOT NULL,
 [Name] [nvarchar](255) NULL,
 [Occupation] [nvarchar](255) NULL,
 [YearlyIncome] [float] NULL,
 [Sales] [float] NULL
)
Please use the query below if you intend to create a new temporary table based on an existing table (portion) in a database.
SELECT  [ProductCategoryKey]  ,[EnglishProductCategoryName]
 INTO #LocalTemp
 FROM dbo].[DimProductCategory]
Using SQL Management Studio to CREATE a TABLE
Within the Management Studio object explorer, expand the Database folder in which you want to create a table. Please select the Tables folder, and right-click on it will open the context menu. Select the New option and then select the Table… option.
It will open the following window to type the Column Name, Data Type, and a checkbox to decide whether it allows any NULL values or not. As you see, we added 7 columns of different data types.
NOTE: By default, the table designer assigns dbo as the default schema. However, use the drop-down menu on the properties window besides the Schema option and select the required one.
Add an Identity Column using SQL Management Studio
Let me show you how to add an identity column to an already-created table using SQL Server Management Studio. First, select the column and go to the Column Properties tab. Next, change the IsIdentity option from a default No to Yes in the Identity Specification property.
TIP: To add keys and relationships, right-click on the column name and choose the required constraint.
Once you finish it, please click on the save button. It will pop up a new window to name the table as per your requirement. Within the pop-up window, click OK to finish saving.
Next, you can write the following SELECT statement to check whether the table holds all the column names or not.
SELECT * FROM CustSSMS;
TIP: You can use the INSERT Statement or insert into to insert data into this newly generated one.
SQL Server CREATE TABLE Best Practices
In SQL Server, creating a table is the most important concept, and everything (data)depends on it. Adding multiple columns and assigning a data type to each is a simple step. However, if you don’t follow best practices, it will affect the data and the performance. Sometimes, you may end up seeing wrong results when querying the data.
- Always use simple and meaningful names for the newly created SQL table. It should reflect the data inside the table. For example, a customer table with only the customer information.
- Although a table can hold thousands (1024) of columns, it is always advisable to use the required number of columns. Any extra column will affect the performance.
- Use appropriate data type for each column. For example, if your string data won’t have any special characters, use VARCHAR instead of NVARCHAR.
- When defining the length or size of a column, calculate the maximum length that you might allow currently and in the near future. For example, 100 means up to 100 characters.
- Use IDENTITY to auto-generate the column values. It is helpful for ID columns.
- Use Primary and Foreign key constraints to establish a relationship between two tables. It is important to use a SQL primary key on every new table that we create.
- The NOT NULL constraint will prevent users from entering NULL values into that column.
- Use the Unique constraint to allow only distinct values.
- Try to split the table into multiple tables (partitions) to improve the query performance and ease maintenance.
- For a more complex structure, please add comments to provide the information to other developers in the future.
- Add indexes to the frequently searched columns (used in WHERE and ORDER BY clauses) to run the queries faster.
- Use default values to auto-fill the record.
- When working with large datasets, use temporary tables to hold the intermediate results. They improve the query performance.
Required Statements to Modify the Table
Once the table is created, you can use the SQL Server statements mentioned below to modify the content within the table.
- DROP TABLE: To delete the existing table.
- ALTER TABLE: To add a new column, modify (data type, size, name), or delete an existing column.
- TRUNCATE TABLE: To empty the table by deleting all the records.
- RENAME TABLE: To change the name of the table.
- INSERT: to add rows.
- UPDATE: Modify the existing rows.
- DELETE: To remove rows.
Comments are closed.