In this section, we show you how to design Talend SCD Type 2 or Slowly Changing Dimension manually. It is one of the important interview questions one might face.
For this Talend SCD type 2 manual demo, we used the same source and destination table that we used previously. Please refer to the Talend SCD example article.
The following are the list of steps required to perform the Talend SCD type 2 manually.
- We need SKey or Surrogate Key. Every time a new record insert into a table, SKey has to increment. So, we need the highest or maximum SKey value from the destination table.
- We have to insert new records into the Emp_SCD2 table.
- Next, compare the new record with the existing table record to check whether it performs a new insert or update. So, we need to perform a lookup.
- After every update of the old value, we have to freshly insert the new record with the same EmpID and new SKey value.
- Next, we have to update the scd_end date of the old record with the current date.
Talend SCD Type 2 Manual Example
First, we used one tDBInput and written the SQL Select statement query to get the Maximum surrogate key value. Here, we used the ISNULL function to replace the NULL return value with zero. When you are inserting the very first record into the table, SELECT MAX(SKey) FROM Emp_SCD2 returns NULL value. To prevent this, we used the ISNULL along with the MAX function.
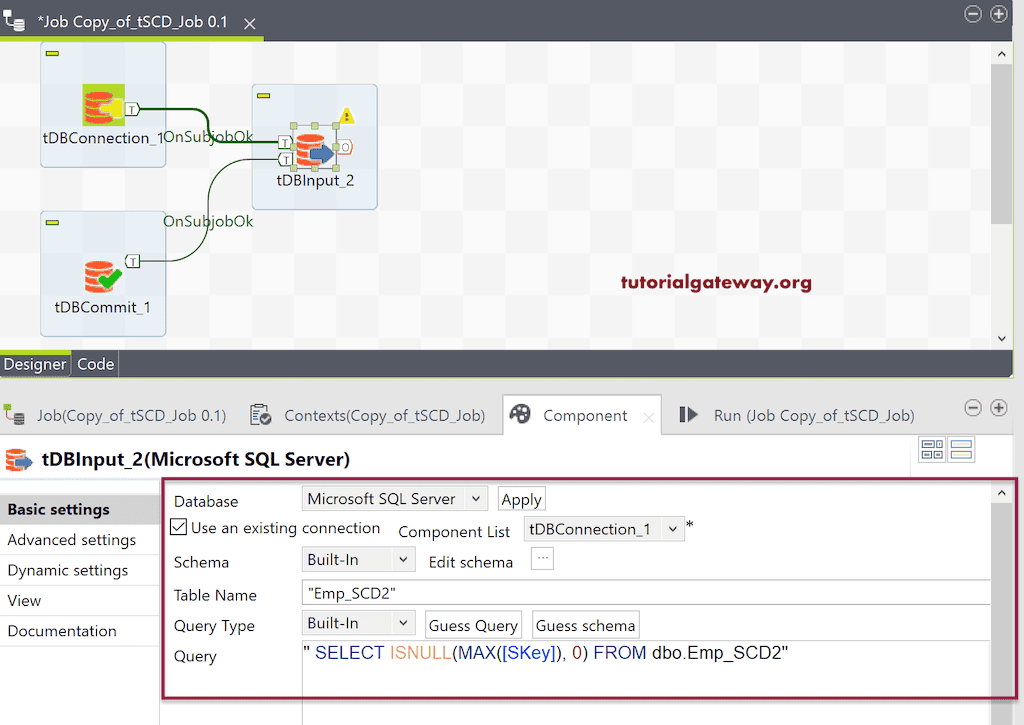
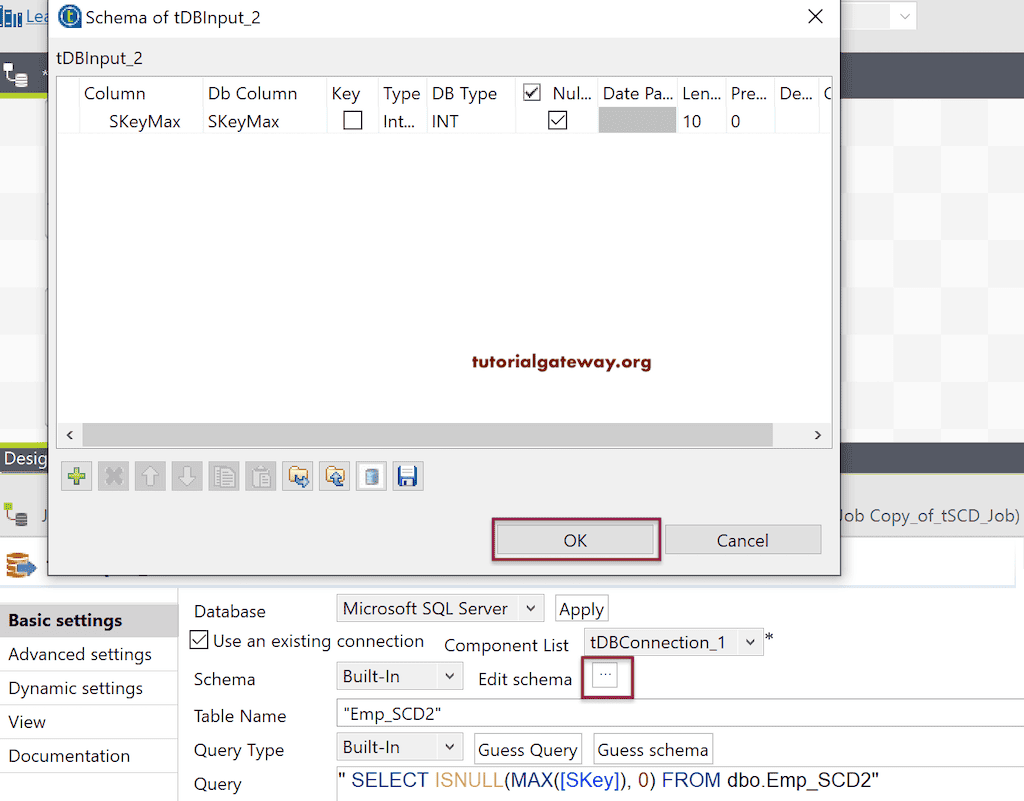
Click on the Edit Schema and add the following column of integer type. It is because the return value of the above select statement is a single value.
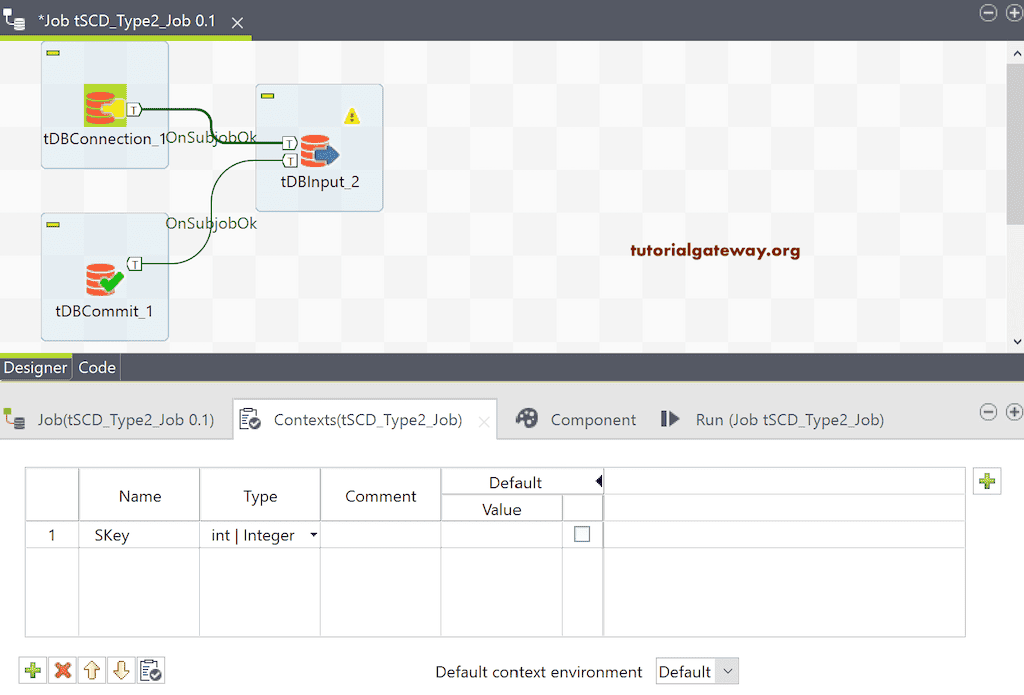
Let me create a context variable to store the Maximum SKey value. By this, we can use this context variable in any component within this job. I suggest you add the default value is zero, which we did afterward.
Next, we added the tJavaRow component and assigned the input row value to the context variable. Here is where we store the maximum surrogate key value in the Talend context variable.

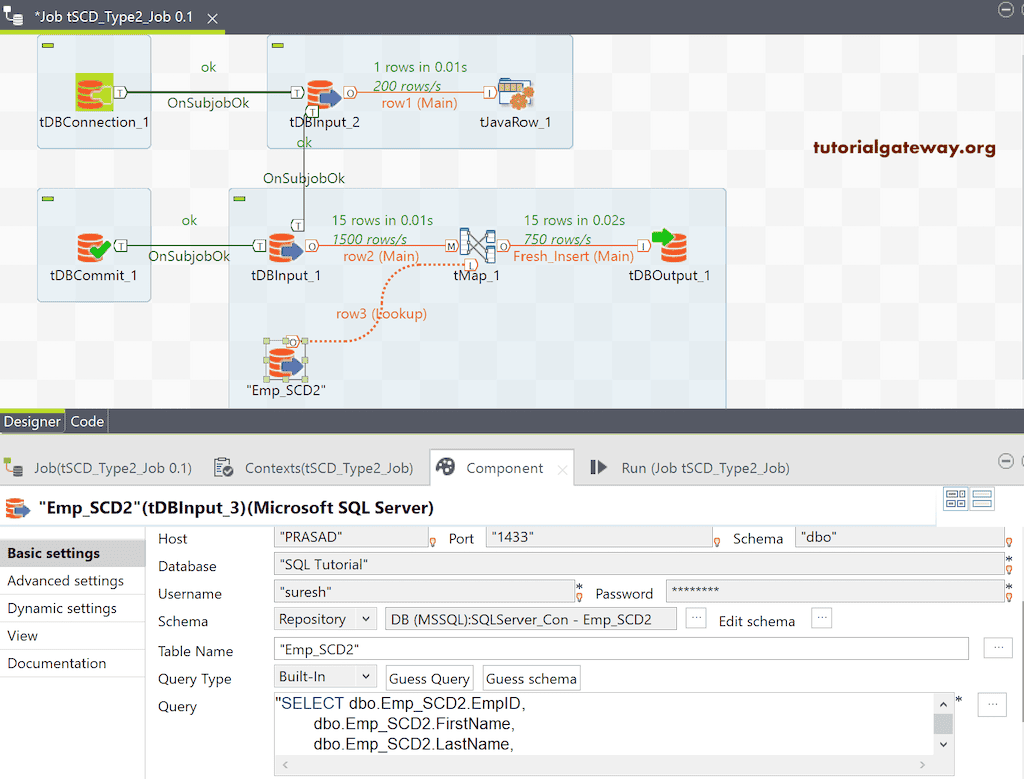
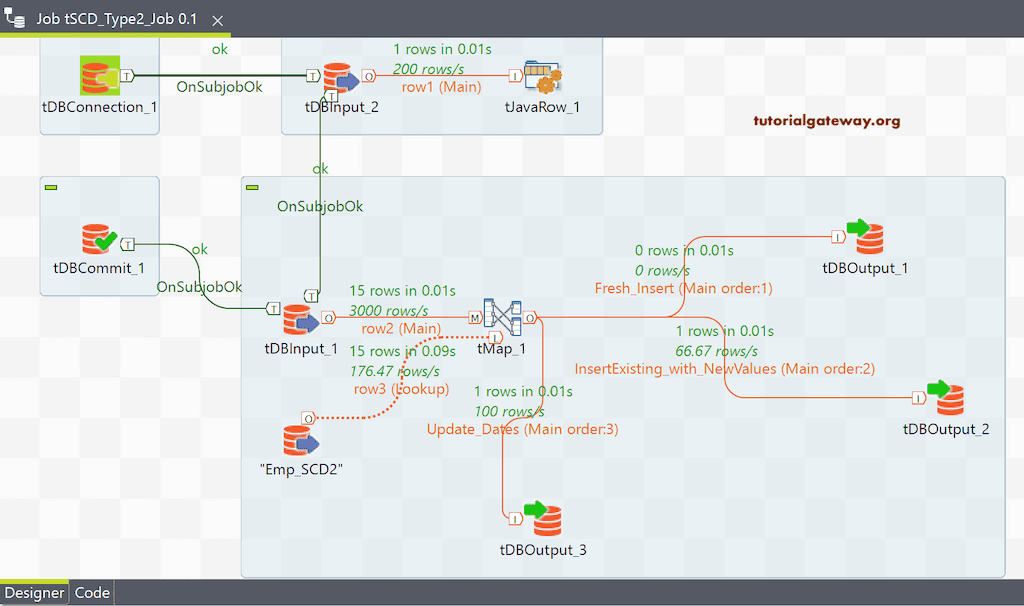
On the subject OK trigger, let me add another tDBInput. This component is the actual input source table.
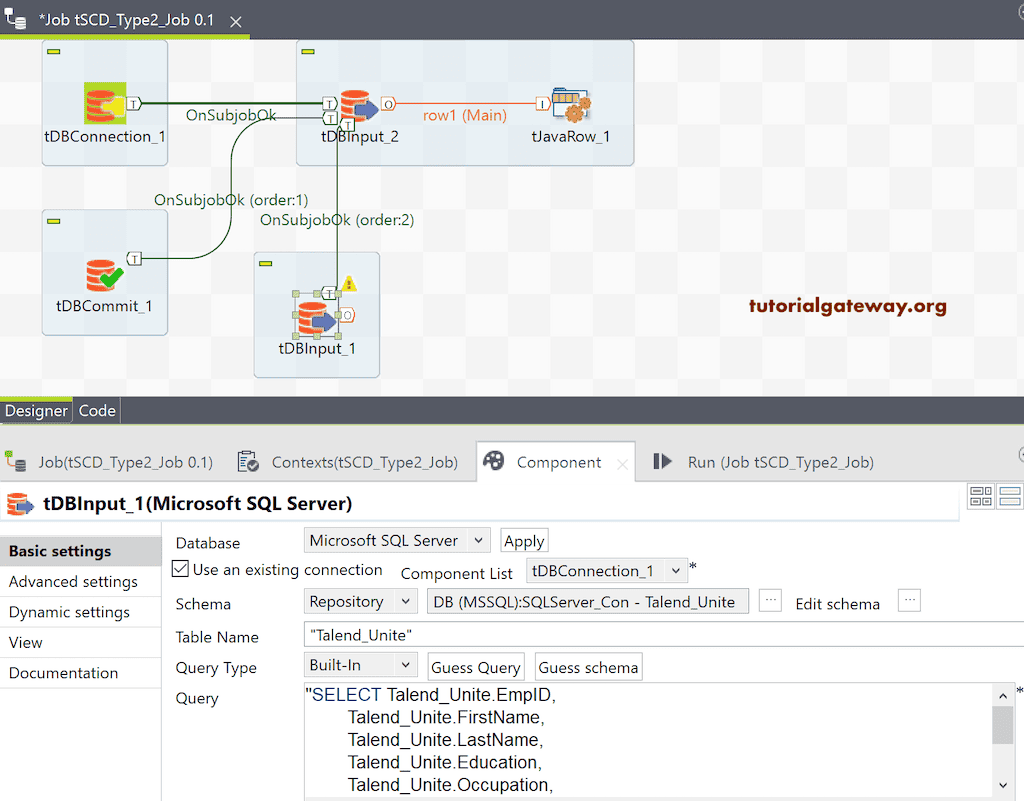
Drag and drop the tMap and connect the tDBInput_1 main row to tMap. Next, add the tDBOutput to insert or load records into the destination table. While connecting tMap with tDBOuput, it will ask you to assign a name for that output. Here, we have given Fresh_Insert as the name.

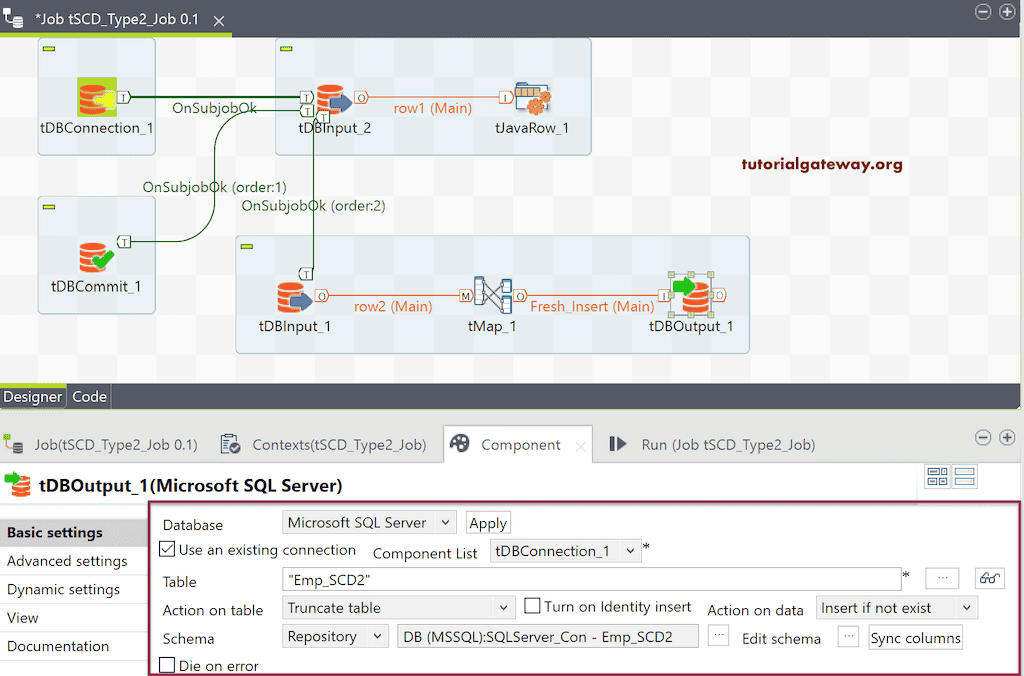
Let me leave the tDBOuput settings to default because we change them later.
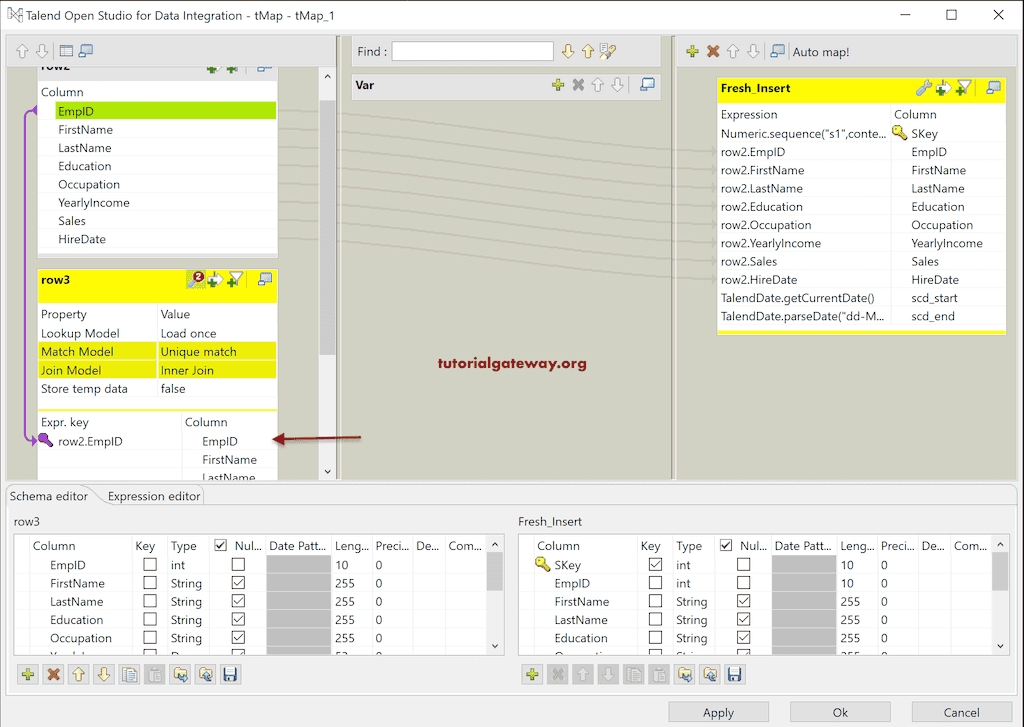
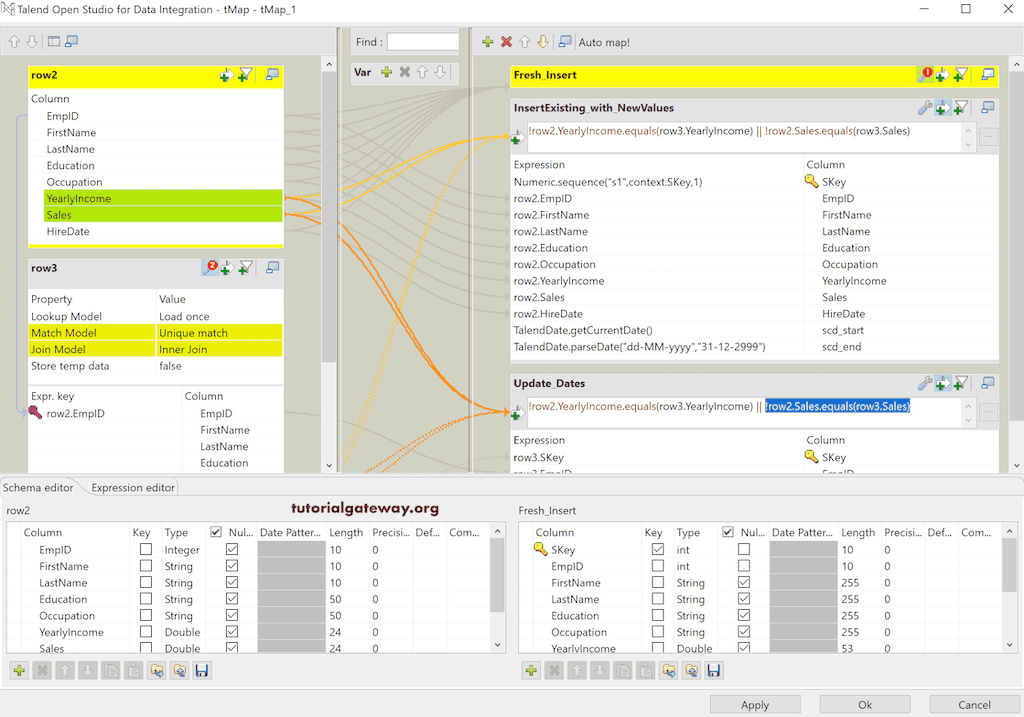
Double-click on the tMap to open the properties window. Please click on the Automap! Button to map the columns.

scd_start means current time or record insert time. So, let me use the Talend getCurrentDate function to get the current date.
scd_end date might change based on the organization. For the Talend SCD type 2 Manual demo purpose, we are using 31-12-2999. Please don’t forget to use the Talend parseDate function to parse or convert the string to the Date data type.
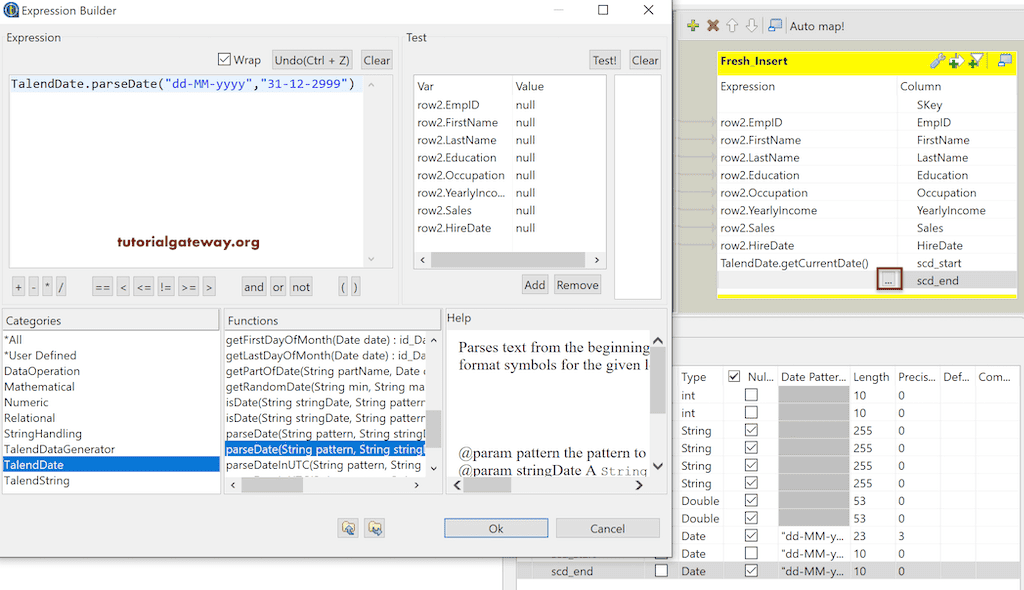
There is a sequencing method under the Talend Numeric section to insert sequential numbers from 1 to N at specified steps, the same as the SQL Auto Increment. We want to insert the sequential numbers from the maximum surrogate key so that we can place the context.SKey as the second argument.

We forgot to add one to the Select statement so, let’s add the same. Select Max(SKey) gives you the maximum value, and the sequence will start from the maximum value, but it has to start from the next value. Remember, you can also change the sequence function code to add one number.

Let me change the action to Insert and check the schema. Next, we are running this Talend SCD type 2 Manual job to check whether we are inserting new records.
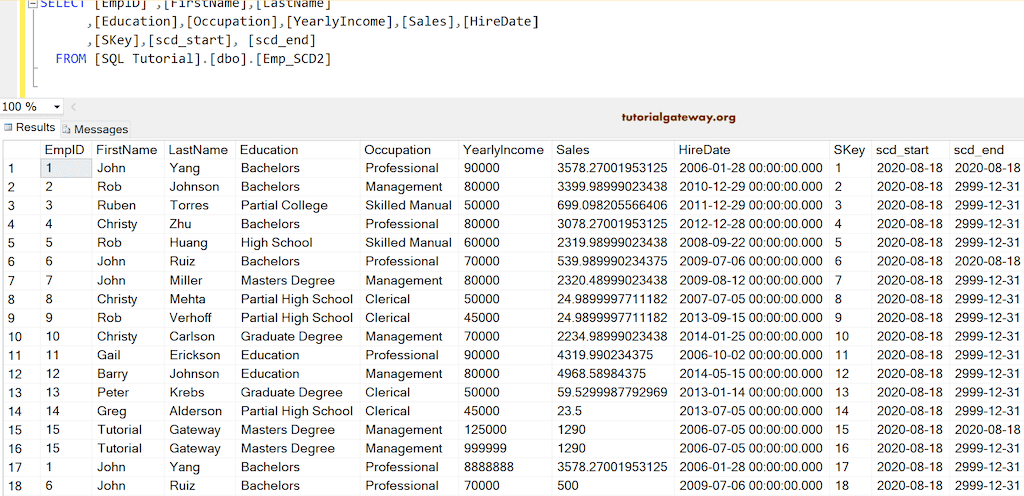
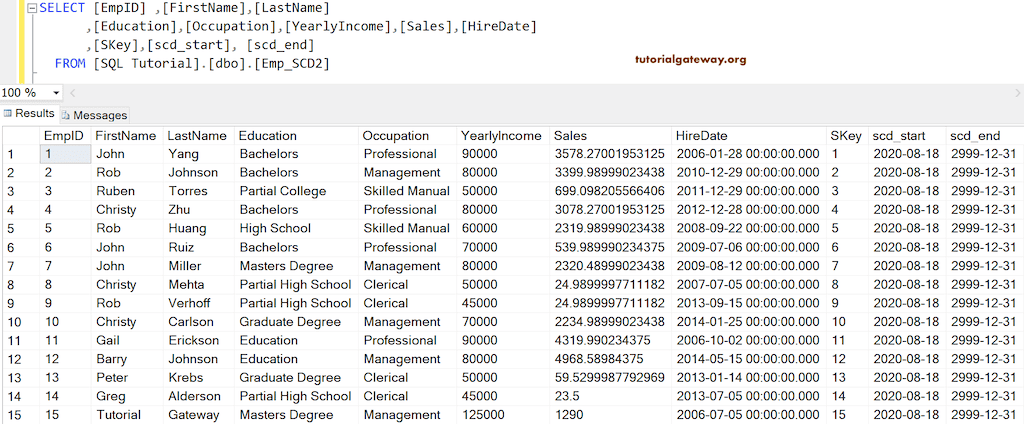
Within the SQL Management Studio, you can see the records with the Surrogate key, scd_start, and end date.
Until now, we have been performing a simple insert. To understand whether it is a new record or an old record with new values, we need to perform the lookup. So, let me add the Emp_SCD2 table as the lookup table to the tMap component. I mean, we are implementing a join.
Double-click on the tMap, and add EmpID as the common key column. Next, change the Join Model to Inner Join, and match Model to Unique Math. By this, we can identify the old and new records.
Click on the Customize icon, and change the Catch lookup inner join option from false to true. It will capture the inner join fail records so that we can pass them to another output.
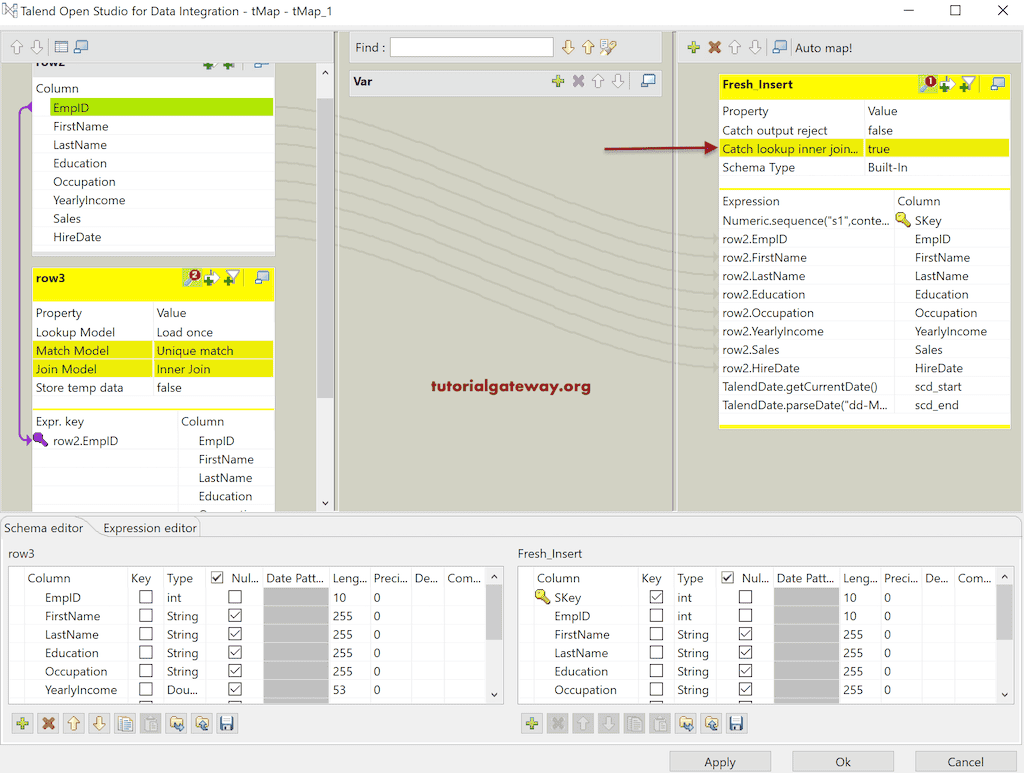
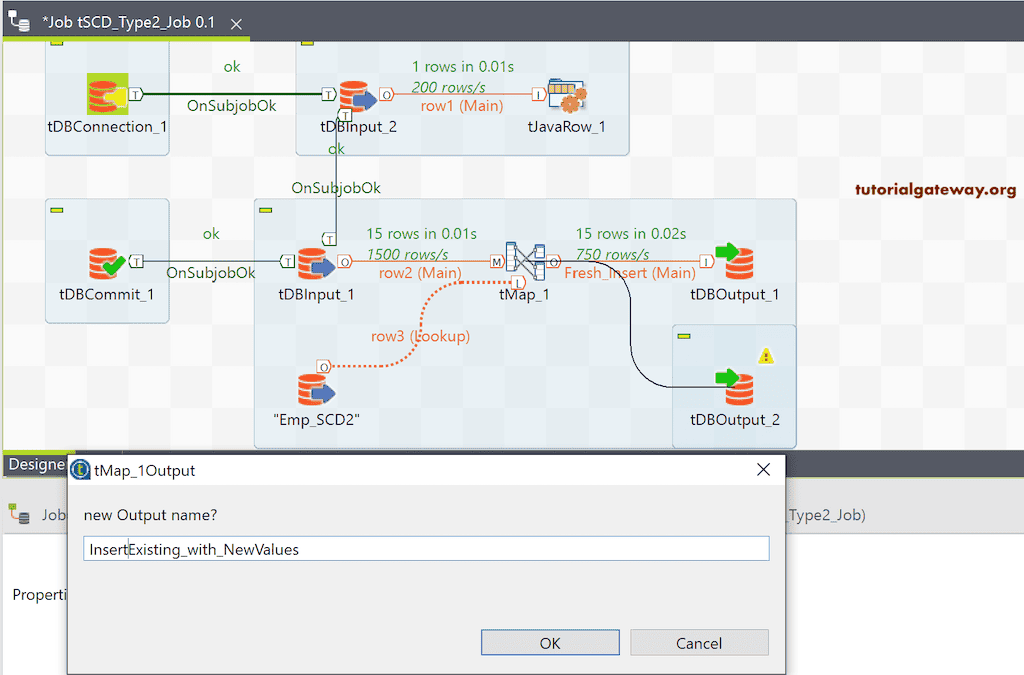
Let me add another tDBOutput connected to the Emp_SCD2 table, and assign the tMap output name as Insert Existing with New columns.
Within the tMap properties, we used the Auto map to connect all the columns. Next, we change the scd_start to the Current date, scd_end to 2999, and SKey to sequential values. Everything is the same as the Fresh_Insert option.

Please click on the Expression and add the following Expression. Here, the equals method compares the old Income value with the New Income value. ! means if both are not equal, then perform this insertion.

Check all the options of the tDBOutput, and run the Talend SCD type 2 Manual job. Before running this job, we changed the Income of EmpID 3 to 666666.

You can see that it has inserted the new record with updated income.

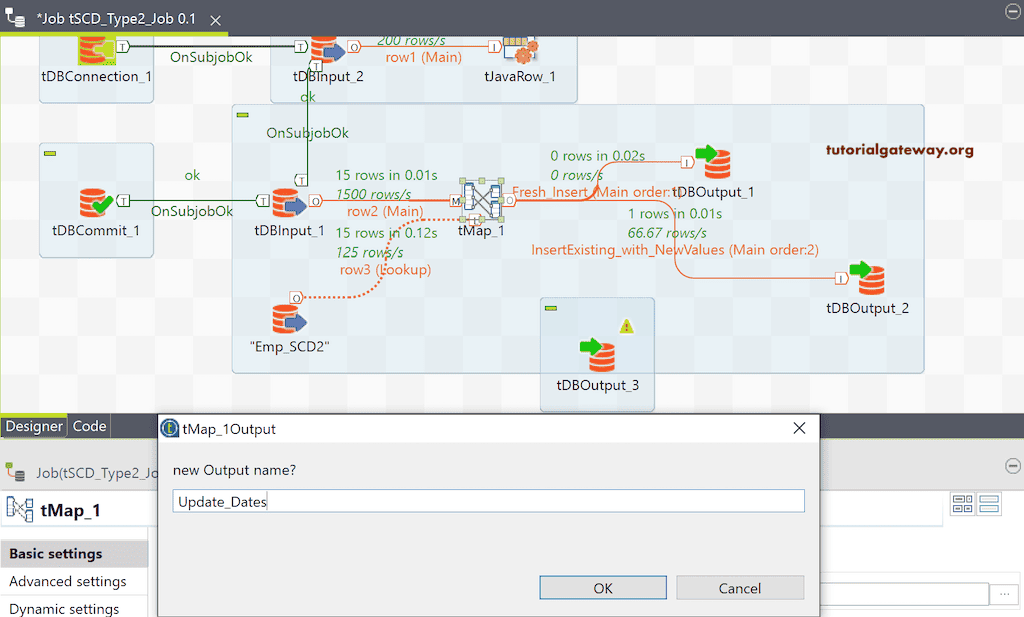
However, we have to update the scd_end date of the old record. For this, we added one more tDBOutput that points to the Emp_SCD2 table. Next, we connected it to tMap and assigned the Update_Dates as the output name.
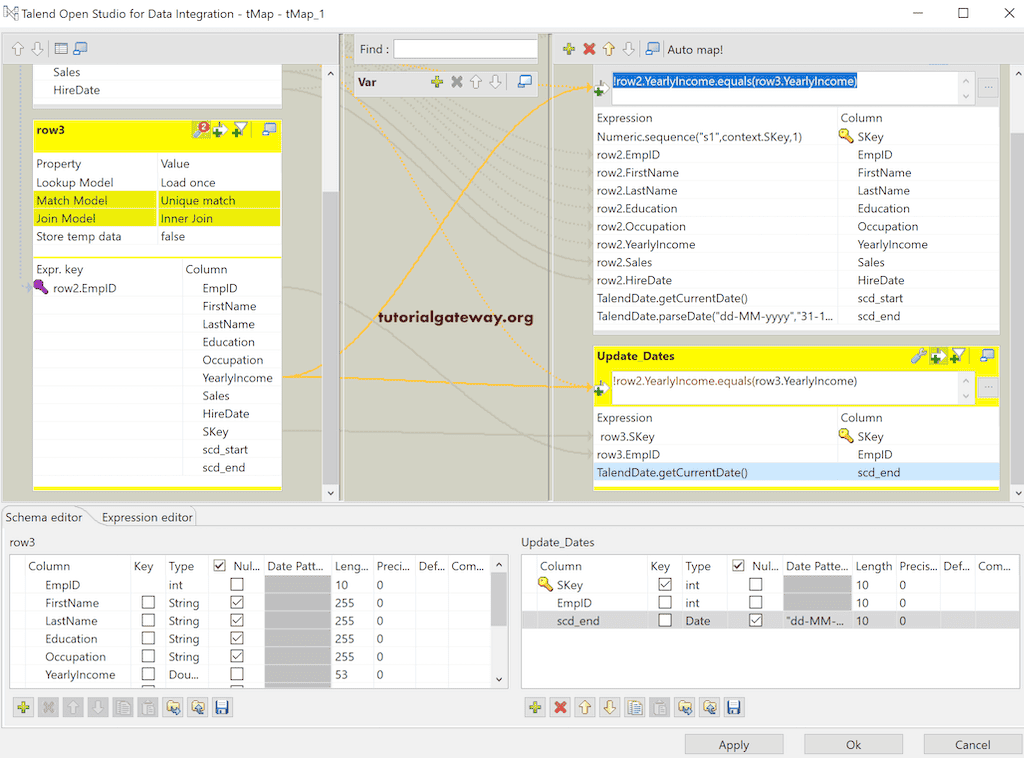
Within the tMap, change the scd_end date to the current date for the Key and EmpID. Please don’t forget to add the following Expression to check which record is changed and which one to replace.
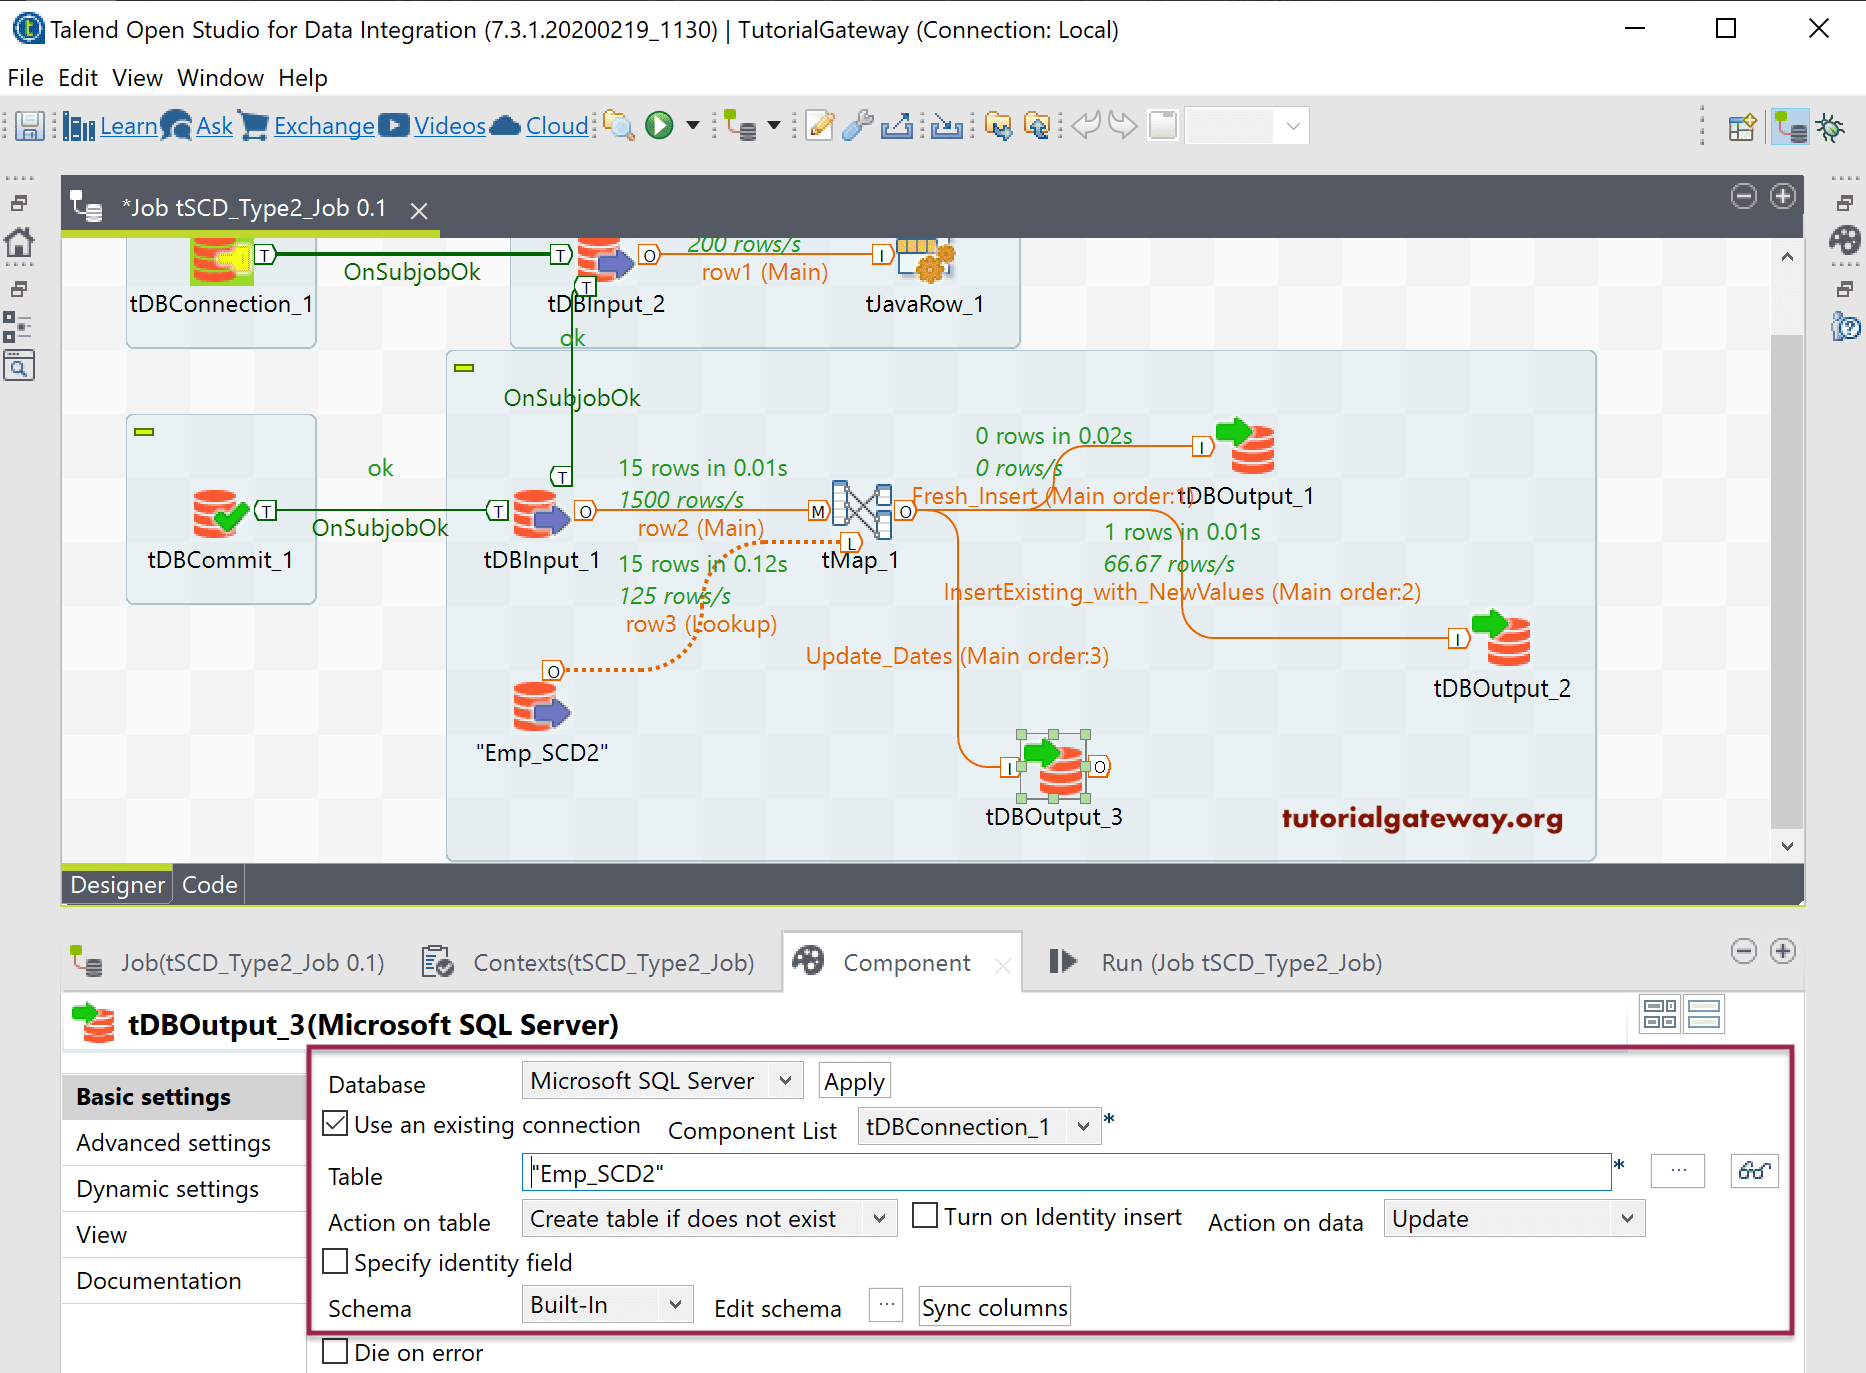
Please change the section on data to update and check the columns using the Edit Schema button.
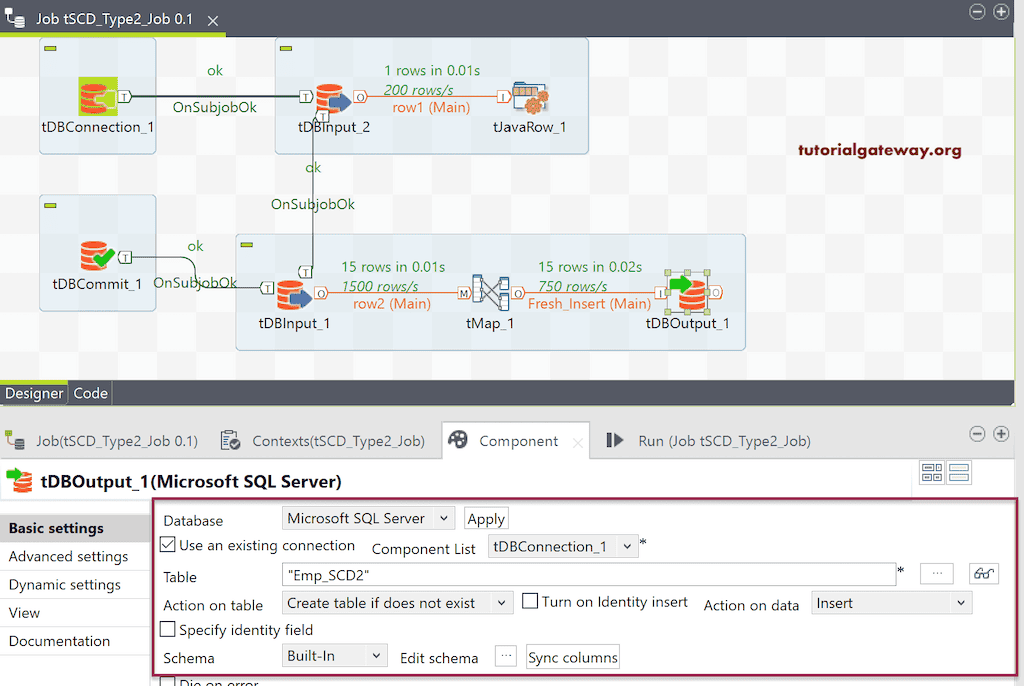
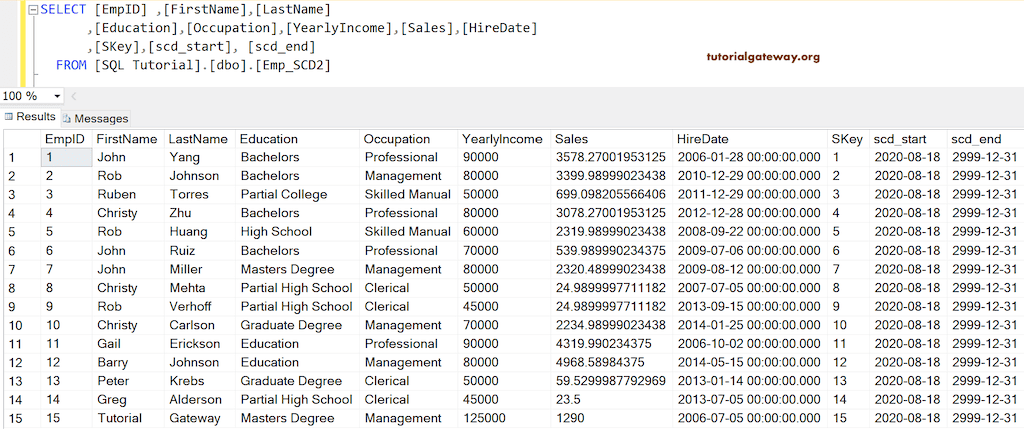
We completed the Talend SCD type 2 Manual job creation. Let me truncate the Emp_SCD2 table and restore the default values of the Talend_Unite table. From the below Talend SCD type 2 screenshot, you can see the 15 records inserted freshly into the table.

You can see the same in the SQL table.
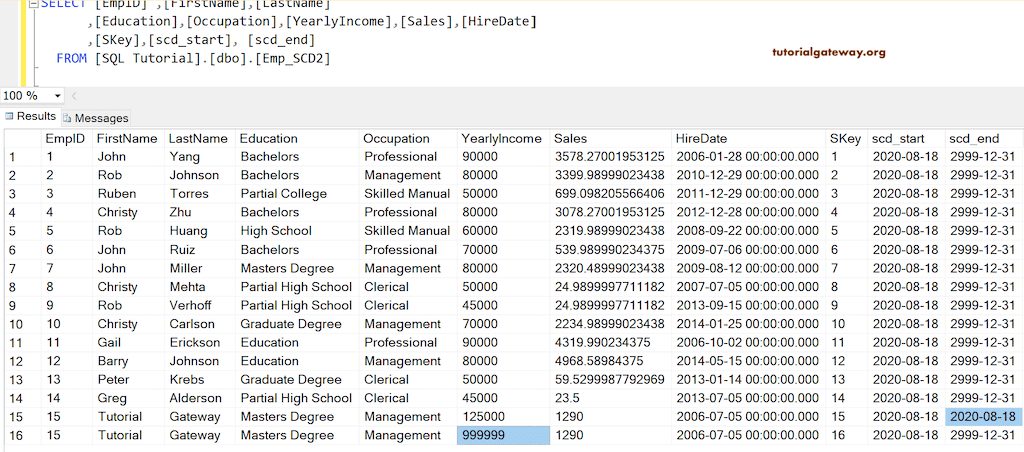
Let me change the income of the EmpID 15 to 999999 and run the job. You can see that one record inserted with a new value, and one update has happened.
Within the SQL Management studio, you can see the new record and old record with an updated date.
Until now, we have been working with one column change. However, you can use logical or || to capture multiple changes. To demonstrate the same, we used the Sales column. Please change the Expression of both Update_dates and Insert Exsiting_with_NewValues.
Let me change the Sales value of one record and the Income value of another record and run the Talend SCD type 2 Manual job.
Please see the output.