Microsoft introduced the MERGE statement in SQL Server 2008 to perform INSERT, DELETE, and UPDATE in a single statement. It is one of the most powerful statements to synchronize the data from two different tables. We can use this to perform ETL operations (data integration tasks) on large datasets when no other operations are happening at that time. You can use this SQL MERGE statement to perform the below mentioned three operations in a single statement:
- To Update the existing records in a target table using the source.
- Inserting completely new records into the table.
- Deleting the records that are no longer required or do not match to current scenario.
What is an SQL MERGE statement?
As mentioned earlier, the SQL Server MERGE statement is a single statement where you can perform the INSERT, DELETE, and UPDATE in one go. So, without using multiple statements for these DML, operations, use the MERGE query. Because a single statement performs multiple operations, the query performance may improve significantly. However, the performance may depend on table data sorted order, indexes, table joins, etc. If we are using a simple table with fewer records, it works brilliantly.
It requires one or more source tables to merge them with the target table data based on the joining condition. It means the SQL MERGE statement first joins the required table with the target table or view. Next, it performs the DML operations needed against them. Therefore, it is helpful to modify the data present in a target based on data in the source table.
SQL MERGE Statement Syntax
One of the common scenarios of using this statement is to maintain the SCD (Slowly Changing Dimension) in the data warehouse. The syntax of the SQL MERGE statement to perform inserts, updates, and deletes rows (UPSERT) in the target table.
MERGE [TOP (expression) [PERCENT] ]
 INTO [Destination_table] AS ds
USING  [Source_Table] AS st -- Include the columns Name
ON ds.[Common column] = st.[Common Column]
-- It's not about matching, You have to add the expressions
WHEN MATCHED [ AND <search_condition> ]
THEN UPDATE | DELETE
WHEN NOT MATCHED [BY TARGET] [ AND <search_condition> ]
  THEN INSERT
WHEN NOT MATCHED [BY SOURCE] [ AND <search_condition> ]
 THEN DELETE
You can wrap the complete statement of the above syntax within the Common Table Expression. The optional TOP CLAUSE restricts the total number of rows by mentioning the number or the percentage value.
From the above syntax, it will check the after the MATCHED clause and operate. Let us explore each and every section of the SQL MERGE statement in detail.
Destination_table: The table or a user-defined view where the change will happen. It means the Destination_table is the place where the inert, delete, or update operations are mentioned by the WHEN CLAUSE.
Source_Table: It is the actual source data that matches against the Destination_table based on the . The matching result of this condition dictates the actions on the Destination_table. For example, if there is a. Matching record, you might push the server to update or delete the record.
AS: Alias names for the table. Please refer to the ALIAS COLUMN article.
ON: After this keyword you have to specify a particular match condition to join the Source and Destination tables. Here, you should only use the common columns from both tables for matching purposes. If you try to add multiple conditions to filter the records (for query performance). It may end up returning a strange and unexpected result set.
AND operator: It helps to add additional conditions. Please refer to the AND operator article.
WHEN MATCHED THEN: Specify what SQL MERGE statement has to do when there is a matching row in the Source and Destination tables; usually, an UPDATE will happen. When there is a matching record in the Destination table, the usual task would be to update with new values, such as updating product price, employee department, etc.
In general, it is followed by the additional , so it DML operation happens only for the rows that satisfy the condition.
The Microsoft SQL Server allows at most two WHEN MATCHED THEN Clauses in the MERGE statement. When you use two, one clause must specify the UPDATE and the other must be the DELETE operation. Also, the first clause must follow by . Remember, the second WHEN MATCHED Clause will apply when the first one doesn’t.
WHEN NOT MATCHED [BY TARGET] THEN: Specify what it has to do when there is no matching record of the Source within the Destination table, usually, an INSERT operation will happen.
WHEN NOT MATCHED [BY SOURCE] THEN: Specify what it has to do when there are additional records in the destination table but no matching record in the Source. In this scenario, one can DELETE them or in some cases, UPDATE them.
Similar to the WHEN MATCHED Clause, the MERGE statement allows two WHEN NOT MATCHED [BY SOURCE] Clauses. The work functionality is the same.
Basic Rules of the SQL MERGE Statement
lthough the syntax of the MERGE statement shows the WHEN [NOT] MATCHED clause in a particular order, in real-time, you can specify them in any order as per your requirement. However, you must use at least one of the above-mentioned three MATCHED clauses.
- In the SQL Server MERGE statement, you have to specify the table name or View on which you want to perform the insertion, deletion, or update (UPSERT) operation.
- Mention the data source that you want to join in the USING clause.
- The ON clause is used to JOIN the Source and target table. Here, you have to specify the common column names that you want to use for joining both tables. Please specify some unique combinations for joining source and destination tables.
- If you don’t use the key columns at the ON clause, you will get duplicate rows and end up with errors.
- You can perform the delete, insert, or update operation based on the result we get from the WHEN clause (WHEN NOT MATCHED, and WHEN MATCHED).
- In the same MATCHED clause, You cannot update the same variable more than once.
- You have to use the semicolon (;) to terminate this statement. Otherwise, the query will throw a 10713 error.
- If you use the @@ROWCOUNT after the MERGE statement, then it will return the number of rows inserted, deleted, and updated.
Best Practices of SQL MERGE statement
If you follow the below-mentioned best practices, you
- Always use the columns with proper index in the ON clause because it improves the performance. For instance, creating an index on joining columns, such as Product ID, Employee ID, etc on both source and target tables.
- Be careful while working on large datasets. Without proper optimized tables, the individual DML operations performs better than the SQL Server MERGE statement. So, please test on small dataset and upon resolving issues, implement the query on large dataset.
- Please use the temporary tables or the Common Table Expressions (CTE) to preprocess the data.
- It is always important to test the code before implementing it on the production server.
- Alway use the TRANSACTIONS to wrap the MERGE statement so that you can rollback to original if something goes wrong.
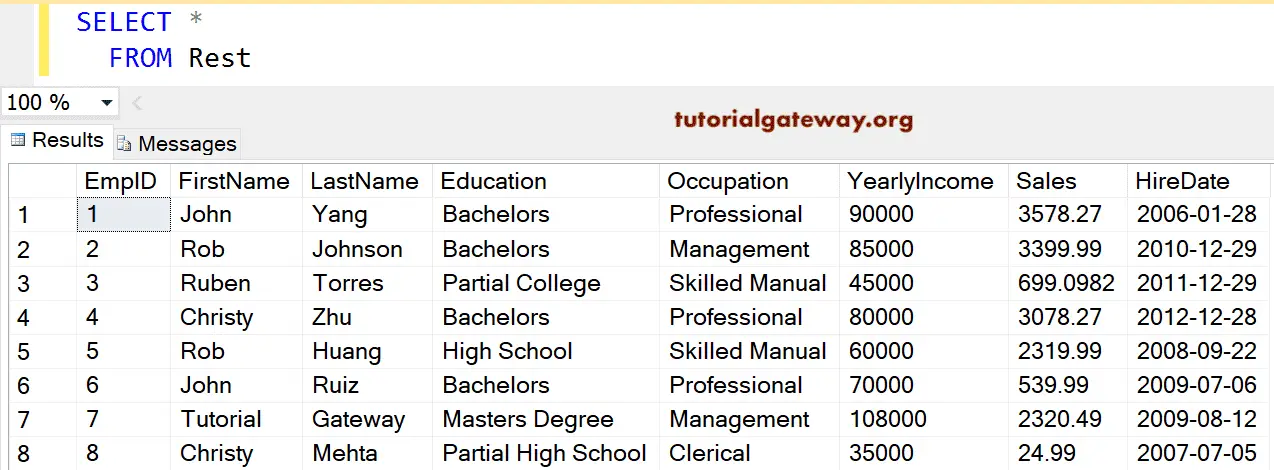
For this SQL Server MERGE Statement example demonstration, we use two tables (Cust and Rest). The rest table has eight records.

How SQL MERGE Works: A Basic Example
Let’s explore a simple and basic example where we will synchronize (DML operations) the employee data from a source into a target table.
CREATE TABLE employees (
    ID INT PRIMARY KEY,
    EmployeeName VARCHAR(100),
    Department VARCHAR(100)
);

CREATE TABLE source_employees (
    ID INT,
    EmployeeName VARCHAR(100),
    Department VARCHAR(100)
);

INSERT INTO employees VALUES
(1, 'Tom', 'HR'),
(2, 'Jhon', 'Accounts');

INSERT INTO source_employees VALUES
(2, 'Jhon', 'Finance'),
(3, 'Lucy', 'Manager');
Target Table: employees
| ID | EmployeeName | Department |
| 1 | Tom | HR |
| 2 | Jhon | Accounts |
Source Table: source_employees
| ID | EmployeeName | Department |
| 2 | Jhon | Finance |
| 3 | Lucy | Manager |
The query to synchronize the data of the two tables are:
MERGE INTO employees AS ds
USING (SELECT * FROM source_employees) AS st
ON ds.ID = st.ID
WHEN MATCHED THEN
    UPDATE SET ds.Department = st.Department
WHEN NOT MATCHED THEN
    INSERT (ID, EmployeeName, Department)
    VALUES (st.ID, st.EmployeeName, st.Department);
The output will be:
- The department of the employee Jhon updated from Accounts to Finance.
- The new employee record Lucy will be inserted into the employee’s table.
If you observe the above example, we haven’t used any of the extra or additional after the MATCHED clause. However, in real time, we may have to use the extra . The following examples will help you understand.
Use SQL MERGE to perform INSERT and UPDATE operations
In real-time operations, inserting new records in to the database and updating the old data with a new information is one of the common task. To fulfill the same, we have to write one UPDATE statement followed by an INSERT statement. With the MERGE statement, you can avoid both of them and perform the operations within this single statement. The below example will show you a simple example to understand you better.
MERGE INTO [Rest] AS rs
USING (SELECT * FROM [Cust]) AS ct
ON rs.EmpId = ct.EmpId
WHEN MATCHED AND rs.[YearlyIncome] <> ct.[YearlyIncome] THEN
   UPDATE SET rs.[YearlyIncome] = ct.[YearlyIncome]
WHEN NOT MATCHED THEN
INSERT ([FirstName],[LastName],[Education],[Occupation],[YearlyIncome],[Sales],[HireDate])
VALUES(ct.[FirstName],ct.[LastName] ,ct.[Education],ct.[Occupation],ct.[YearlyIncome]
           ,ct.[Sales],ct.[HireDate]);

The above example performs the conditional updating on the table so that it avoids the unnecessary locks on the table. If there are no matching records to update, it will insert those records into the Rest table.
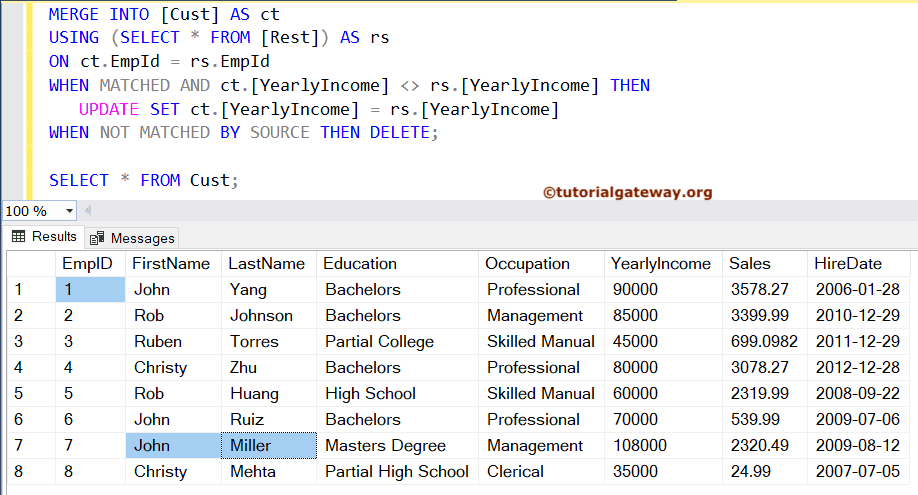
Use MERGE to perform UPDATE and DELETE operations
Apart from the above situation, there are some cases where we have to delete the outdated products (irrelevant to current business). And update the pricing of the trading products. To achieve the same either you have to use the combination of both UPDATE and DELETE statements or a simple SQL MERGE statement.
This example is slightly different from the above because we will update the Cust table using the Rest. So, we use the Rest as the source and perform UPDATE and DELETE on the Cust table. As we all know, the Rest table has eight records, the below query removes the extra six records and UPDATE the Yearly Income of those 8 records if there is any changes.
MERGE INTO [Cust] AS ct
USING (SELECT * FROM [Rest]) AS rs
ON ct.EmpId = rs.EmpId
WHEN MATCHED AND ct.[YearlyIncome] <> rs.[YearlyIncome] THEN
   UPDATE SET ct.[YearlyIncome] = rs.[YearlyIncome]
WHEN NOT MATCHED BY SOURCE THEN
    DELETE;
SQL Server MERGE Statement to Perform UPDATE, INSERT, and DELETE
The following query does the insert, delete, and Update operations on Rest using the Cust table.
MERGE [Rest] AS mrg
USING (SELECT * FROM [Cust]) AS emp
ON mrg.EmpId = emp.EmpId
WHEN MATCHED AND mrg.[YearlyIncome] <= 50000 THEN DELETE
WHEN MATCHED AND mrg.[YearlyIncome] >= 80000 THEN
   UPDATE SET mrg.[YearlyIncome] = mrg.[YearlyIncome] + 35000
WHEN NOT MATCHED THEN
INSERT ([FirstName],[LastName],[Education],[Occupation]
           ,[YearlyIncome],[Sales],[HireDate])
VALUES(emp.[FirstName],emp.[LastName],emp.[Education]
           ,emp.[Occupation],emp.[YearlyIncome],emp.[Sales],emp.[HireDate]);
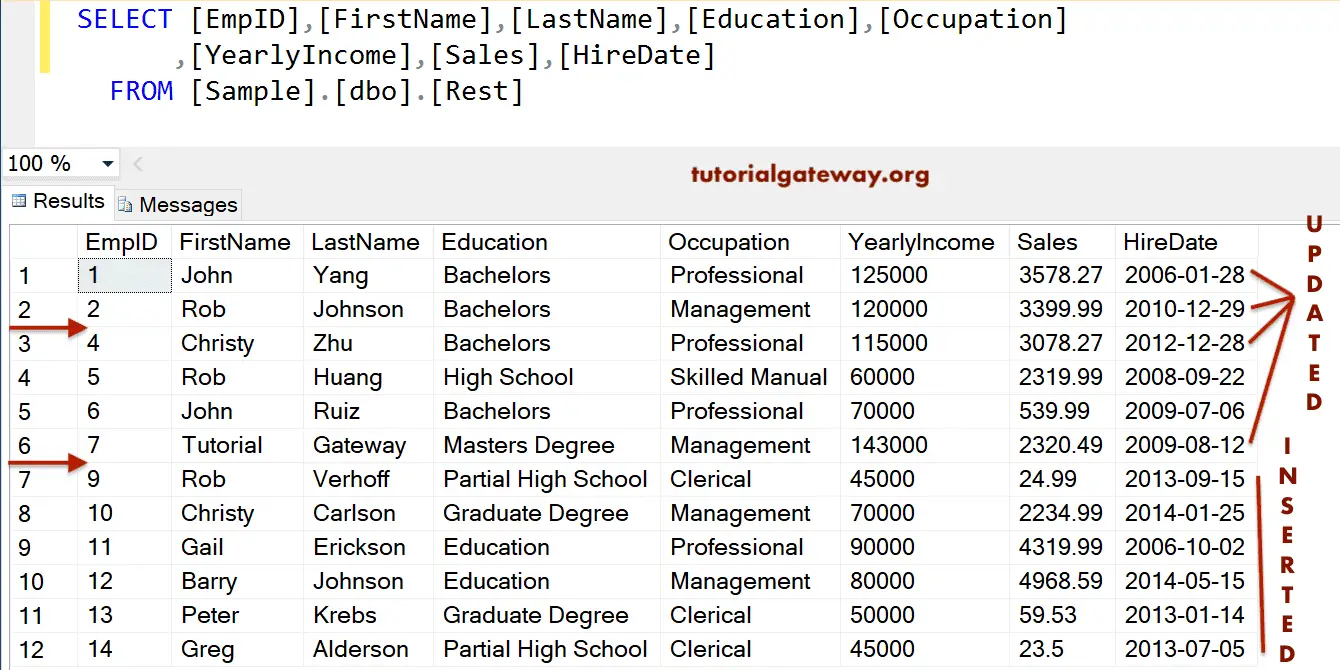
First, we are using the above table in the SQL Merge clause. It means we want to perform insert, delete, and update operations on Rest.
Next, we are using the Cust in the SQL Server USING clause. It means we want to Join the Rest with this data source.
USING (SELECT * FROM [Cust]) AS emp
It checks whether any employees whose Yearly Income is less than or equal to 50000 or not. If TRUE then, delete those records from Rest. In real-time, you can also use this to delete the records from Rest whose values do not match with the Source.
WHEN MATCHED AND mrg.[YearlyIncome] <= 50000 THEN DELETE
The next statement checks whether any employees whose Yearly Income is greater than or equal to 80000 or not. If matched then Update the set of those records by adding 35000 to each record in the Rest table. Again, Please refer to the UPDATE Statement article.
WHEN MATCHED AND mrg.[YearlyIncome] >= 80000 THEN
   UPDATE SET mrg.[YearlyIncome] = mrg.[YearlyIncome] + 35000
The next statement will Insert the non matching records from the Cust table to Rest. Please refer to the INSERT Statement article to understand the functionality.
WHEN NOT MATCHED THEN
INSERT ( .....
          ........)
Use Transactions on SQL MERGE Statement
The following query is the best approach to using the MERGE statement. Because we wrap the complete query inside the transaction for atomicity. Whenever you are performing a MERGE operation, try to place the code inside the transaction (BEGIN TRAN ….. ROLLBACK TRAN). If something goes wrong or any of the operations fails, it will roll back everything to the original.
BEGIN TRAN;
	MERGE Rest AS mrg USING (SELECT * FROM [Cust]) AS ct
	ON mrg.EmpId = ct.EmpId
	WHEN MATCHED AND mrg.[YearlyIncome] <= 50000 THEN DELETE
	WHEN MATCHED AND mrg.[YearlyIncome] >= 80000 THEN
		UPDATE SET mrg.[YearlyIncome] = mrg.[YearlyIncome] + 35000
	WHEN NOT MATCHED THEN
	INSERT ([FirstName],[LastName],[Education],[Occupation]
           ,[YearlyIncome],[Sales],[HireDate])
	VALUES(ct.[FirstName],ct.[LastName],ct.[Education]
           ,ct.[Occupation],ct.[YearlyIncome],ct.[Sales],ct.[HireDate])
	OUTPUT $action, inserted.*, deleted.*; -- Only to show the Actions
ROLLBACK TRAN;
GO
In general, the OUTPUT clause returns a copy of the data that we inserted, deleted, and updated in our tables. That’s why we used the OUTPUT Clause with the Merge Statement to show the query.

The following statement code will give more control over the printed action result.
SQL Server MERGE Statement Output Clause
The OUPUT clause helps you keep a track on table changes. It includes, whether the row has updated, deleted, or inserted during there MERGE operation.
In this merge statement example, we are declaring the table variable @Example with columns representing Delete, and Insert operations on each column.
For example, DelFirstName is to capture the delete operation on [FirstName]. The InsLastName is to capture the Insert operation on [LastName]. Please refer to the Delete Statement article.
DECLARE @Example TABLE
(
  ActionType NVARCHAR(10),
  DelID INT,
  InsID INT,
  DelFirst NVARCHAR(50),
  InsFirst NVARCHAR(50),
  DelLast NVARCHAR(50),
  InsLast NVARCHAR(50),
  DelEdu NVARCHAR(50),
  InsEdu NVARCHAR(50),
  DelOcc NVARCHAR(50),
  InsOccu NVARCHAR(50),
  DelIncome INT,
  InsIncome INT,
  DelSales FLOAT,
  InsSales FLOAT,
  DelHire DATE,
  InsHire DATE
);
MERGE [Rest] AS mrg
USING (SELECT * FROM [Cust]) AS emp
ON mrg.EmpId = emp.EmpId
WHEN MATCHED AND mrg.[YearlyIncome] <= 50000 THEN DELETE
WHEN MATCHED AND mrg.[YearlyIncome] >= 80000 THEN
  UPDATE SET mrg.[YearlyIncome] = mrg.[YearlyIncome] + 35000
WHEN NOT MATCHED THEN
INSERT ([FirstName]
           ,[LastName]
           ,[Education]
           ,[Occupation]
           ,[YearlyIncome]
           ,[Sales]
           ,[HireDate])
VALUES(emp.[FirstName]
           ,emp.[LastName]
           ,emp.[Education]
           ,emp.[Occupation]
           ,emp.[YearlyIncome]
           ,emp.[Sales]
           ,emp.[HireDate])
OUTPUT $action,
    DELETED.EmpID,
    INSERTED.EmpID,
    DELETED.FirstName,
    INSERTED.FirstName,
    DELETED.LastName,
    INSERTED.LastName,
    DELETED.Education,
    INSERTED.Education,
    DELETED.Occupation,
    INSERTED.Occupation,
    DELETED.YearlyIncome,
    INSERTED.YearlyIncome,
    DELETED.Sales,
    INSERTED.Sales,
    DELETED.HireDate,
    INSERTED.HireDate
  INTO @Example;

SELECT * FROM @Example;

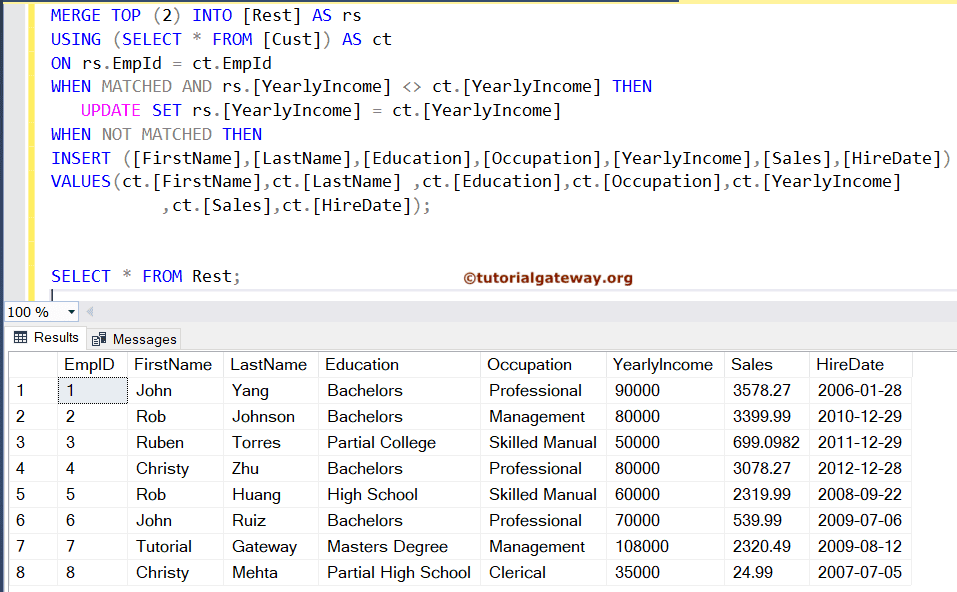
TOP Clause Example
If you look at the syntax, the SQL Server MERGE statement allows you to use the TOP clause with a number or PERCENTAGE to perform the DML operations batch-wise. When you use the TOP clause, first, the query will join the complete source and destination tables. Next, it applies the TOP clause on top of that to remove the rows that don’t satisfy the number. For instance, TOP 20 means the MERGE statement will perform INSERT, UPDATE, and DELETE on those 20 rows, and the remaining are ignored (removed for the query).
To demonstrate the TOP clause, we use the same example query that we used in the INSERT and UPDATE operations example. Here, we added TOP 2 in between the MERGE and INTO keywords. So, the below query will perform the INSERT and UPDATE on the first 2 records and ignore the remaining 6 records. This way, you can perform the data synchronization batch-wise.
MERGE TOP (2) INTO [Rest] AS rs
USING (SELECT * FROM [Cust]) AS ct
ON rs.EmpId = ct.EmpId
WHEN MATCHED AND rs.[YearlyIncome] <> ct.[YearlyIncome] THEN
   UPDATE SET rs.[YearlyIncome] = ct.[YearlyIncome]
WHEN NOT MATCHED THEN
INSERT ([FirstName],[LastName],[Education],[Occupation],[YearlyIncome],[Sales],[HireDate])
VALUES(ct.[FirstName],ct.[LastName] ,ct.[Education],ct.[Occupation],ct.[YearlyIncome]
           ,ct.[Sales],ct.[HireDate]);
If you see the result, the yearly income of teh second record has been updated but left the 7 and 8 records as it is.
SELECT * FROM Rest;
SQL MERGE statement with Triggers Example
If there are any AFTER triggers enabled on the Destination_Table, then the Server will fire those triggers for every update, delete, or insert action mentioned on the MERGE statement.
If there are any INSTEAD OF INSERT, UPDATE, or DELETE triggers enabled on the Destination_Table, then the action will be different. Instead of deleting or updating the target_table, it fires those INSTEAD OF triggers to perform those actions on the defined tables. Similarly, the INSERT operation fires the INSTEAD OF INSERT trigger to add a new record to the defined table (not the Destination_Table).
To demonstrate the triggers, we will create an AFTER INSERT and AFTER UPDATE triggers on the employee (target) table that was shown on the basic example. Next, the source_employee is the source table. Let me create one more table to store the audit log and then create triggers.
CREATE TABLE AuditLog (
    LogID INT IDENTITY(1,1) PRIMARY KEY,
    EmployeeID INT,
	Name VARCHAR(100)
    ActionType VARCHAR(10),
    ChangedAt DATETIME DEFAULT GETDATE()
);

CREATE TRIGGER emp_AuditLog
ON employees
AFTER INSERT, UPDATE
AS
BEGIN
	-- Insert Operation
	INSERT INTO AuditLog(EmployeeID, Name, ActionType)
	SELECT ID, EmployeeName, 'INSERT' FROM inserted
	WHERE NOT EXISTS (
		SELECT 1 FROM deleted WHERE deleted.ID = inserted.ID)

	-- Update Operations
	INSERT INTO AuditLog(EmployeeID, Name, ActionType)
	SELECT ID, EmployeeName, 'UPDATE' FROM inserted
	WHERE EXISTS (
		SELECT 1 FROM deleted WHERE deleted.ID = inserted.ID);
END
Query:
MERGE INTO employees AS e
USING (SELECT * FROM source_employees) AS st
ON e.ID = st.ID
WHEN MATCHED THEN
UPDATE SET e.Department = st.Department
WHEN NOT MATCHED THEN
INSERT (ID, EmployeeName, Department)
VALUES (st.ID, st.EmployeeName, st.Department);

To avoid firing the triggers, you may disable those triggers first, and perform the SQL MERGE operations on the target tableland then ENABLE the TRIGGERS. The below code disables the triggers.
DISABLE TRIGGER triggerName ON employees;
Use the MERGE statement to perform the UPSERT. Next, use the below code to enable the triggers back.
ENABLE TRIGGER triggerName ON employees;
SQL Server MERGE Statement Common Errors: Fix It!
By understanding the MERGE statement common errors and the steps to fixing them, you can ensure smooth an effective data synchronization operations in the production. By following the below mentioned advices, you can avoid the syntax issues, multiple source rows, duplicates, etc.
UPDATE Same row more than once
This error occurs when there are multiple or more than one row matching with a target table (many to one). To demonstrate the same we use the employee table that we created in a basic example. Next, we truncate the source_employees and INSERT the below values. If you look at the source, there are two records with ID value 2, Name is Jhon, and the Department is different.
INSERT INTO source_employees VALUES
(2, 'Jhon', 'Finance'),
(2, 'Jhon', 'Manager');
The SQL MERGE statement below tries to update the employee table Department column using the source. Since there are two rows with the same ID and Name, the below query will show an error.
MERGE INTO employees AS ds
USING (SELECT * FROM source_employees) AS st
ON ds.ID = st.ID
WHEN MATCHED THEN
    UPDATE SET ds.Department = st.Department;
Msg 8672, Level 16, State 1, Line 14
The MERGE statement attempted to UPDATE or DELETE the same row more than once. This happens when a target row matches more than one source row. A MERGE statement cannot UPDATE/DELETE the same row of the target table multiple times. Refine the ON clause to ensure a target row matches at most one source row, or use the GROUP BY clause to group the source rows.
To fix the above error, either you have to use the DISTINCT keyword for unique rows or GROUP BY clause to group them.
TRIGGER Example
I will use the same example. The below trigger will fire for every UPDATE on the employee table. As you already know, it will fire two times to update the same row.
CREATE TRIGGER updateEmployee
ON employees
AFTER UPDATE
AS
BEGIN
    -- Some logic to update another table
    UPDATE AuditLog
    SET EmployeeID = inserted.id
    FROM inserted
    WHERE AuditLog.EmployeeID = inserted.id;

  -- Insert Operation
  UPDATE AuditLog
  SET ID = inserted.ID FROM inserted
  WHERE AuditLog.EmployeeID = inserted.ID
END;
SQL MERGE statement attempted to DELETE a row that doesn’t exist
This error occurs when you try to delete a record from the target table which does not exist. To demonstrate the same we use the employee and source_employee tables that we created in a basic example. Imagine, the ID = 3 (Lucy) is not required in the current scenario and we want to delete out from the target table.
The SQL MERGE statement will UPDATE one record of ID 2 and trying to check whethe there are any matching Employee ID to UPDATE. As there are no matching ID of 1 iin the employee and no reference to Id three (which does not exists). Since there are no matching rows with ID 1 and 3, both of them will be deleted.
MERGE INTO employees AS ds
USING (SELECT * FROM source_employees) AS st
ON ds.ID = st.ID
WHEN MATCHED THEN
    UPDATE SET ds.Department = st.Department
WHEN NOT MATCHED BY SOURCE THEN
    DELETE;
Ambiguous Column References
This error occurs when you forget to use the ALIAS or fully qualified table names in the SQL MERGE statement to specify which table a particular column belongs to. For example, let me use the Rest and Cust tables that we shown earlier. Here, the server will confuse with [YearlyIncome] column, whether it has to use the Rest table or the Cust table. So, it ended up throwing the Ambiguous Column References error.
MERGE [Rest] AS mrg
USING (SELECT * FROM [Cust]) AS emp
ON mrg.EmpId = emp.EmpId
WHEN MATCHED AND mrg.[YearlyIncome] >= 80000 THEN
   UPDATE SET [YearlyIncome] = [YearlyIncome] + 35000
Msg 209, Level 16, State 1, Line 5
Ambiguous column name 'YearlyIncome'.
To fix the above, replace the last UPDATE line with the below.
UPDATE SET mrg.[YearlyIncome] = mrg.[YearlyIncome] + 35000
Handling NULLs in Source Table
There are some situations where the Source table has NULL values and while performing the UPDATE using the SQL MERGE statement, the existing values will replaced by NULLs. It is one of the common scenarios that you may face in real time. If your data has the NULLs and the target table has the correct value, you must use the COALESCE function to handle the NULL values.
To demonstrate the same we use the employee table. Next, we truncate the source_employees and INSERT the below values.
INSERT INTO source_employees VALUES
(2, 'Jhon', NULL),
(3, 'Lucy', 'Manager');
The MERGE statement below trying to update the ID = 2 and INSERT ID = 3 into employee. As you can see, the Department of the ID is NULL. To address these issues, use COALESCE function.
MERGE INTO employees AS ds
USING (SELECT * FROM source_employees) AS st
ON ds.ID = st.ID
WHEN MATCHED THEN
    UPDATE SET ds.Department = COALESCE(st.Department, ds.Department)
WHEN NOT MATCHED THEN
    INSERT (ID, EmployeeName, Department)
    VALUES (st.ID, st.EmployeeName, st.Department);
Things to Consider:
- Although the TOP clause restricts the total number of rows, the SQL MERGE statement performs a full table scan on the Source and Destination tables. So, the query performance is at stake.
- The batch-wise operations are good, but we have to ensure that we are using the query on a fresh batch at each time. Otherwise, we ended up seeing the incorrect results. To avoid this, use additional which helps to disallow updating the same records twice, etc.
Comments are closed.