MySQL uses Tables to store and Manage Data, and this article shows how to Create Tables with an example. Here, we will use both the command prompt and Workbench for the Create Table statement.
The table is a combination of Rows and Columns. We have to use the Create Table Statement to create a new one.
MySQL Create Table Syntax
The basic syntax to create a table is shown below.
CREATE TABLE 'TableName'
(
    Column_Name1 Data_Type(Size) [NULL | NOT NULL],
    Column_Name2 Data_Type(Size) [NULL | NOT NULL],
     …
    Column_NameN Data_Type(Size) [NULL | NOT NULL]
);
Let us see the individual items from the MySQL Create table syntax:
- TableName: Please provide a Unique name. It throws an error if the name already exists.
- Column_Names: Unique or distinct Column Names are required.
- Data Type: A valid Data type for every individual column. For example, Int, Varchar, and float.
- Size: Please provide a valid integer number here
- NULL or NOT NULL: If the NULL option is selected, the column accepts both normal values and NULL values. Otherwise, it throws an error stating the Column should not be empty.
Create a Table using MySQL Command Prompt
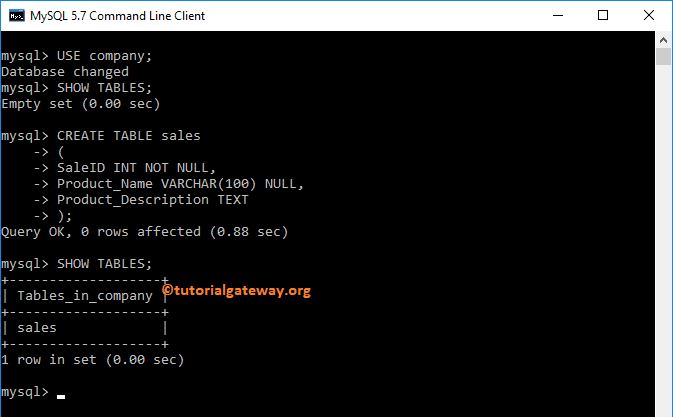
Before we start creating a table in the Company Database, Let us see the list of existing ones inside the database. To get this information, use the following command.
SHOW TABLES;
The first section of the below screenshot shows the available ones in the MySQL database. As you see, the company Database had no existing ones. For the demo purpose, we constructed a new called sales using MySQL create table statement.
CREATE TABLE sales
(
   SaleID INT NOT NULL AUTO_INCREMENT,
   Product_Name VARCHAR(100) NULL,
   Product_Description TEXT
);
From the second part of the below screenshot, see that the Command was executed successfully. Now, let’s see the list of available ones in the company database. Notice the sales name in the list.
MySQL Create Table Workbench Example
This time, we use the below-shown code to create Customers tbl inside the Company Database.
USE company;
CREATE TABLE customers (
    CustID INT NOT NULL AUTO_INCREMENT,
    First_Name VARCHAR(50) NULL,
    Last_Name VARCHAR(50) NULL,
    Education VARCHAR(50) NULL,
    Profession VARCHAR(50) NULL,
    Yearly_Income INT NULL,
    Sales FLOAT(10, 2) NULL,
  PRIMARY KEY (CustID)
)
NOTE: Before you start creating a new one, It is always advisable to check if it exists or not.

In the above code, we declared 7 Columns in our newly created table in MySQL:
- Our first column is CustID of Integer data type, and it won’t allow NULL values. We also defined this column as Auto Incremental. (This is optional If you want, You can delete the Auto_Increment portion)
- FirstName, LastName, Education, and Profession columns belong to the Varchar data type, and it won’t allow NULL values. We also assigned the size to 50. It means these columns accept up to 50 characters
- The sixth column is the Yearly Income of INT data type, and it allows NULL values.
- Sales columns belong to the float data type, and it allows NULL values.
From the below screenshot, see that the command was executed successfully. Now, you can see the Newly created one under the Tables folder. If you didn’t find the newly created table, Please click on the refresh button beside the SCHEMAS
How to find Table Definition?
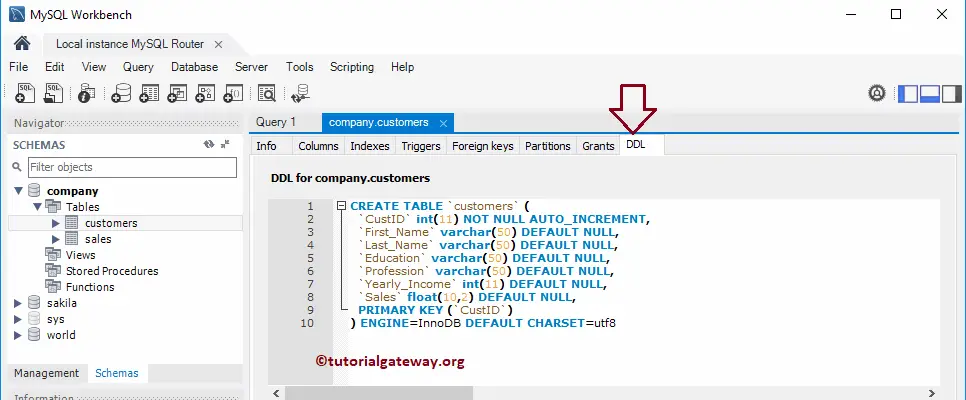
To find the existing definition, right-click on the newly created name and select the Table Inspector option from the context menu. Here, we use the customers table.
Once you select that option, a new tab opens with all the information. Please go to the DDL tab to see the definition.
How to Check whether the Table name exists or not?
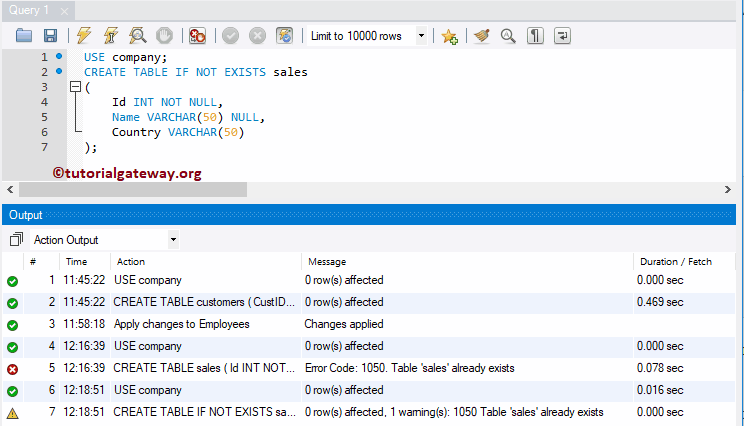
Let us see what happens if we create a table in MySQL with an existing name. From the below screenshot, you can see it is throwing an error saying: TableSales already exists.
USE company;
CREATE TABLE sales
(
    Id INT NOT NULL,
    Name VARCHAR(50) NULL,
    Country VARCHAR(50)
)
NOTE: It is always advisable to check whether the table name exists already or not.
If you have the privilege to see the list of available ones in a database, then use the SHOW TABLES command. If this is not the case, use the below option.
The following statement only executes Create Table Statement if the sales are not available in the company database. Please try different names using the create table command.
USE company;
CREATE TABLE IF NOT EXISTS sales
(
    Id INT NOT NULL,
    Name VARCHAR(50) NULL,
    Country VARCHAR(50)
);
Create MySQL Table Using Workbench GUI
To create a table in Workbench, within the SCHEMAS, expand the Database folder in which you want to create a new table. Right-click on the folder and open the context menu. Please select the Create Table… option.
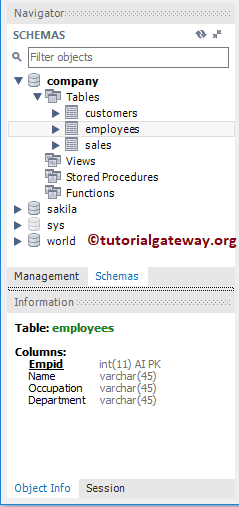
It will open the following window to design a tbl. Please change the TableName from new_table to Employees.
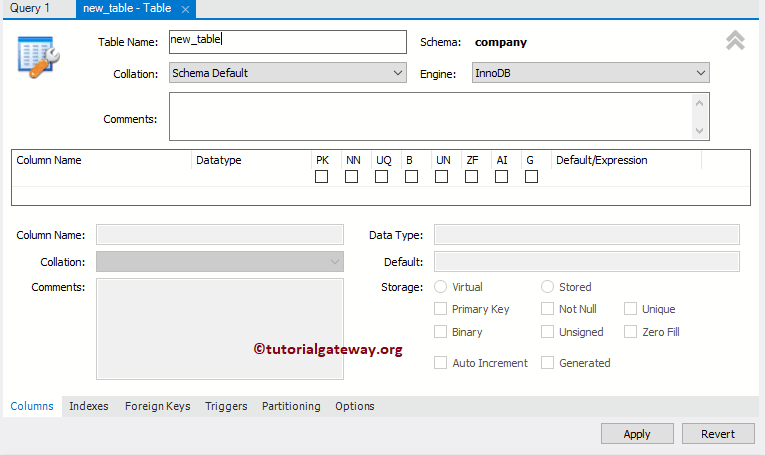
You can use the Collation drop-down box to change the Schema Default collation to latin, big5, hp8, etc. Next, you can change the Default server Engine using the Engine drop-down list to CSV, Spider, Aria, etc.
For now, we are leaving all the default configurations. Next, click on the arrow to get more space for designing.
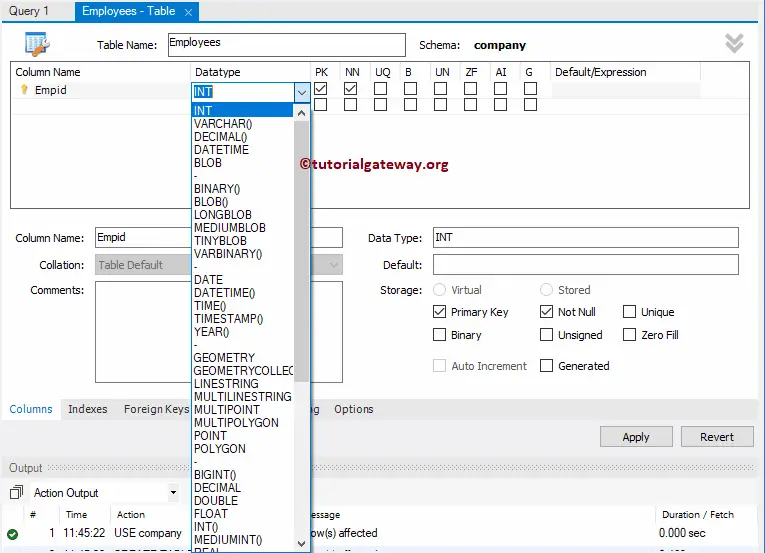
Click on the Empty row below the Company Name automatically to create a new column for you. Let me rename it Empid and change the Data Type as per your requirement. Also, use checkboxes for Not. Null, Primary, Unique key options, etc.
From the below screenshot, you can see, that there are four columns. Click the apply button to create employees.
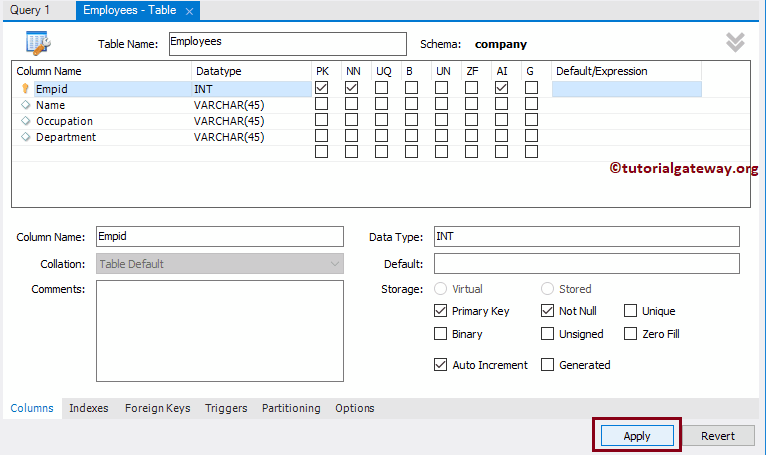
TIP: Please use the checkboxes beside the Column Names or under the storage section to make the columns Primary, Unique, Not Null, Binary, Unsigned, Auto Incremental, Zero Fill, and Generated.
Click the Apply button to create a table in MySQL. On the next screen, please hit the Finish button.
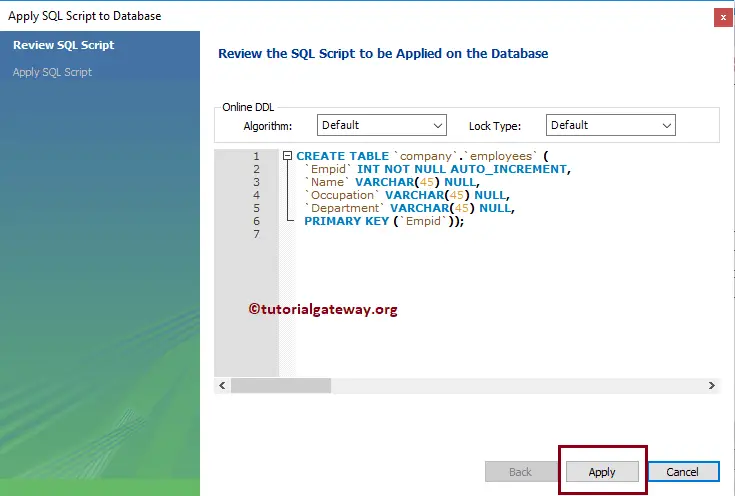
Once you click the Finish button the creation of the table will complete. From the below screenshot, you can see the employees. You can use the INSERT Statement to insert data into this.